
What is Expansion Microscopy?
Sponsored by Andor, on 27 May 2021
How can you get the most information from expanded samples?
Traditional light microscopy is limited by the diffraction of light, consequently, features less than 200 nm apart cannot be resolved. For a significant time microscopy technique development was focused towards improving imaging techniques to allow for individual molecules to be resolved. Super-resolution microscopy was developed at the beginning of the 21st century to allow to imaging at a resolution beyond the 200 nm barrier. [1][2] However, super-resolution techniques have limitations, such as limited field of view, limited imaging depth, incompatibility with multicolour experiments, slow acquisition time and high energy illumination intensity requirements. To overcome these hurdles, a few creative research groups went in a different direction and explored what could be done to allow standardised and straightforward nanoscale imaging. Expansion Microscopy (ExM) is an imaging protocol which allows conventional light microscopes to see sub-diffraction limited (<200 nm) or densely packed details which previously could not be distinguished. The development of this new modality of magnification was reported in 2015 by Edward Boyden’s team at MIT. While attempting to overcome the difficulties in mapping molecules across the large scales of neural circuits in the brain, Boyden’s research group developed a way to magnify the specimen itself, instead of magnifying the emitted signal from the specimen. [3]
Glossary
| AcX | acryoyl-X, SE, 6 – (acryoyl amino hexanoïc) ester succinimidylique (crosslinking agent that reacts with amines of proteins and be copolymerised in polyacrylamide matrices) |
| DiExM | differential expansion microscopy |
| DMAA | N,N dimethylacrilamide acid – (nonionic acrylic monomer that can make swellable polymeric particles) |
| ExFish | expansion microscopy fluorescence in situ hybridisation |
| ExM | expansion microscopy |
| FP | fluorescent protein |
| GA | glutharaldehyde (crosslinking fixative, penetrate membran more slowly than PFA) |
| HCR | hybridisation chain reaction |
| iExM | iterative expansion microscopy |
| IF | immunofluorophore |
| MA NHS | methacrylic acid N-hydroxysuccinimide ester (crosslinking agent that reacts with amines of proteins and can be copolymerised in polyacrylamide matrices) |
| MAP | maximum analysis of the proteome |
| MBAA or BA | N’N Methylenebis (acrylamide) /(bisacrylamide) crosslinking agent that polymerise with acrylamide and creates crosslinks within the polyacrylamide gel) |
| PFA | paraformaldehyde (crosslinking fixative, preserves the secondary/tertiary structures of proteins) |
| ProExM | protein-retention expansion microscopy |
| SDS | sodium dodecylsulfate (anionic surfactant useful to denature and dissociate proteins) |
| SRRF | super resolution radial fluctuations |
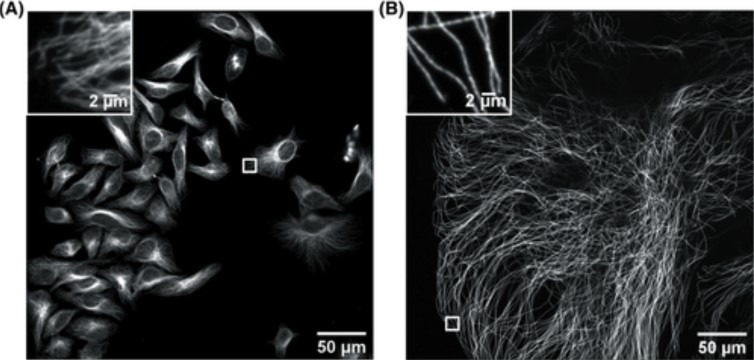
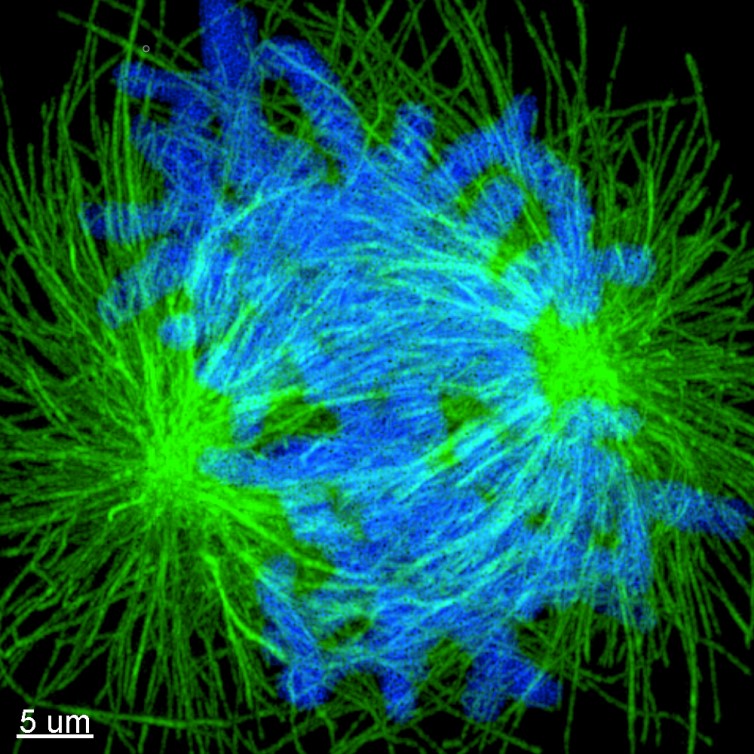
ExM is a cost-effective sample preparation method which consists of synthesising a dense interconnected web of swellable polymer within a biological specimen. The tissue, within the polymer matrix is expanded and labelled. Once immersed in water, the expansion pulls apart the cellular structures isotropically to create large gaps between each biomolecule. The specimen is isotropically magnified, as a result an effective higher resolution is achievable with a standard microscope. A 4x linear expansion is reported in pure water which means a 64x volumetric expansion. Using Andor spinning disk confocal (Dragonfly) on an expended microtubule Hela cells sample shown in Figure 1 reveals how using expansion microscopy protocols researchers can see previously unseen details in their samples. Nevertheless, care must be taken when preparing expanded samples; successful implementation of the expansion microscopy protocols relies on:
- Embedding safely: the polymer needs to be inserted into cells using a non-invasive methodology. Carefully inserting the small monomers into the cells and tissues. These monomers are building blocks of the hydrogel that will then expand. The trick is to trigger the monomer polymerisation once they are inside the preserved cells and tissues.
- Expanding without de-structuring: the key is expanding the sample whilst keeping the structural organisation of cells intact. To ensure the expansion does not distort the sample, the specimen is treated with heat/detergent or an enzymatic digestion to mechanically homogenise the specimen which ensures that the organisation remains intact.
Comparison of expansion microscopy protocols. See the glossary above for the abbreviations
| Protocol name | ExM (Boyden Lab) | ExM (Vaughan Lab) | ProExM (Boyden Lab) | MAP (Chung Lab) | ExFiSH (Boyden Lab) |
|---|---|---|---|---|---|
| Hydrogel | acrylamide + sodium acrylate +++ MBAA | acrylamide + sodium acrylate +++ | acrylamide + sodium acrylate +++ | acrylamide +++ sodium acrylate + BA | acrylamide sodium acrylate MBAA |
| Linking agent | acrydite | MA-NHS GA | acryloyle-X (AcX) | paraformaldehyde acrylamide | LabelX (AcX + Label-IT amine) |
| Disruption agent | proteinase K | proteinase K | proteinase K | SDS | proteinase K |
| Disruption type | digestion | digestion | digestion or gentle disruption | denaturation dissociation | digestion |
| Expansion factor (linear) | 4.5 | 4.0-4.2 | 4 | 4 | 3.3 |
| Resolution | 70 nm | 65 nm | 70 nm | 60 nm | / |
| FP preservation | no | yes | yes (50% intensity) | no | no |
| IF staining | no | yes | yes | yes | no |
| Sample | cells, brain tissue | cells, brain tissue | cells, brain, pancreas, lung, spleen tissues | cells, brain, spinal cord, lung, heart, liver, kidney, intestine tissues | cells, brain tissue |
| Target | proteins | proteins & DNA | proteins | proteins & saccharides | RNA & DNA |
| Pros comments | first method reported | conventional fluorophores organelle level | conventional fluorophores post-expansion labelling | post-expansion labelling whole organ level multiplexed staining | 3D imaging post-expansion FISH multiplexing & HCR amplification |
| Cons comments | complex protocol no standard fluorophores | pre-expansion labeling only fluorescence loss | incomplete homogeneisation fluorescence loss | incompatibility w/ FPs preparation lost after 3 days | / |
| Reference | [3] | [5] | [6] | [7] | [8] |
| Variant | iExM | x10 | x10; DiExM | uExM |
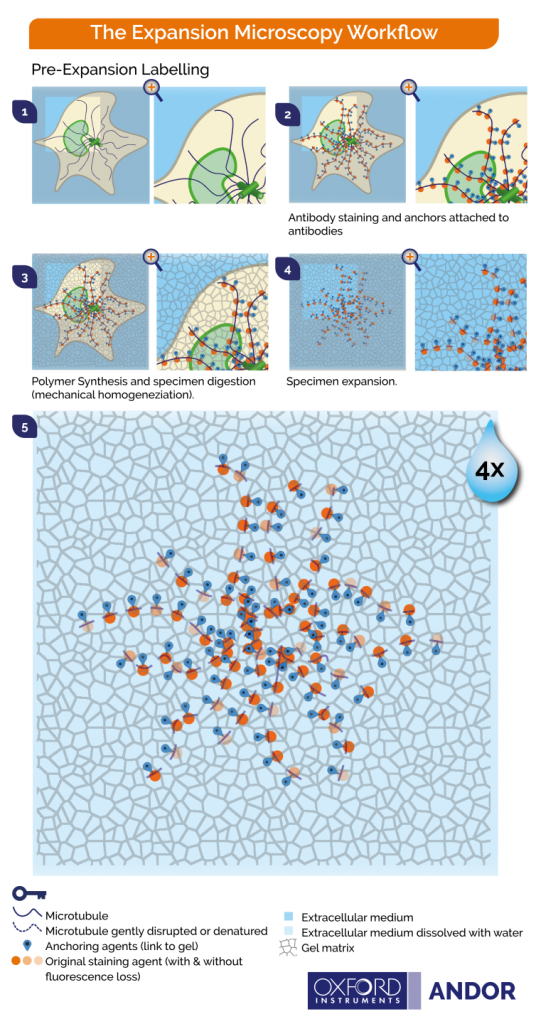
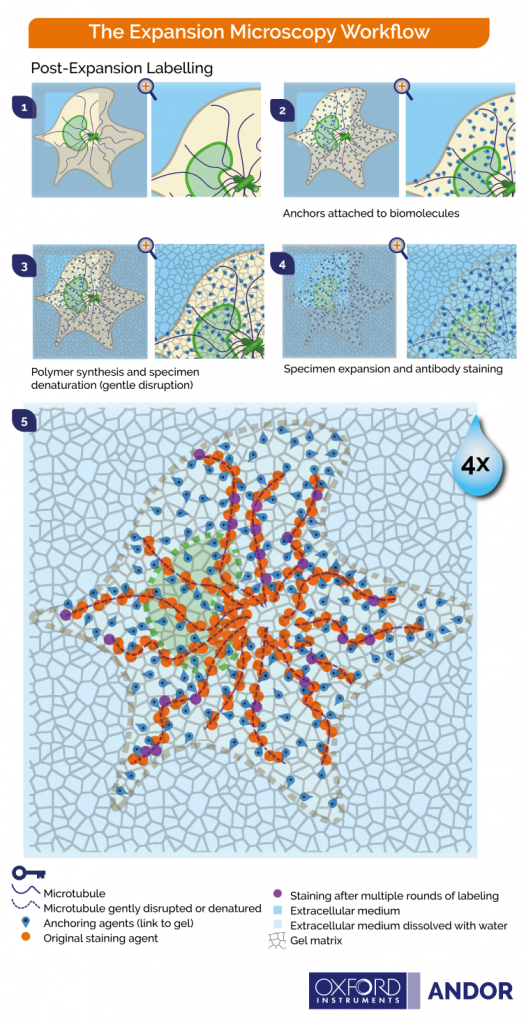
There are 2 main approaches for expansion microscopy:
- Stain the biomolecules and then expand the tissue (Figure 2)
- Expand and then stain the biomolecules of the tissue (Figure 3)
The graphics shown in Figure 2 and Figure 3 represent the protocols in which cells and tissues are expanded up to 4x. The 200 nm diffraction limit of light sets a boundary on what can be distinguished as separated by light microscopes. Since the linear expansion achieved is a factor of 4, using these protocols, biomolecules that are separated up to 50 nm will be visible under the light microscope.
Fundamental steps of expansion microscopy
Through expansion, the fluorescent signal is also isotropically expanded. As a result, an effective higher resolution is achieved. The key steps for expansion microscopy protocols are:
(see also Figure 2 and Figure 3)
- Labelling: biomolecules are tagged with fluorophores (in post-expansion labelling method this step is performed at the end, after the expansion).
- Anchoring: biomolecules and/or labels are covalently equipped with molecular handles. Those cross-linkers will allow the polymer matrix to exercise their force on the biomolecules.
- Gelation: To avoid damaging the cells, the polymer chain is broken down into its constituent parts (its building blocks). The specimen is immersed in a monomer solution (sodium acrylate) and a highly penetrating hydrogel (sodium polyacrylate). Once inside the cells, a chemical reaction is triggered, the monomers will bind to form a network of the desired polymer.
- Homogenisation: the aim is to avoid sample distortion and ensure that the specimen organisation is kept intact. The sample is chemically disrupted either by enzymatic digestion or by a heat and detergent treatment (denaturation/dissociation). The choice of homogenisation treatment depends on the nature of the specimen and the molecules to be visualised.
- Expansion: the specimen is immersed in water, which diffuses into the polyelectrolyte hydrogel through osmotic force. The water will promote the expansion of the polymer. The expansion pulls apart anchored biomolecules in an isotropic way and creates huge gaps between each biomolecule. The spatial organisation of the expanded specimen is preserved allowing nanoscale imaging with standard fluorescent microscopes.
Most popular protocols of expansion microscopy
Since its development, several different Expansion Microscopy protocols have been published. Currently, there are variations and improvements which cover a wide range of applications. Below we present a table summarising the main protocols for expansion microscopy.
In summary, two main strategies of expansion microscopy co-exist: the pre and the post-expansion labelling strategies (figures 2 and 3), and the different protocols are adapted to specific cellular structures. When starting on expansion microscopy imaging, care must be taken to choose the correct protocol to visualise the desired subcellular structure. It might be required to optimise a protocol to better suit the experimental conditions; researchers should not forget to design the proper experimental controls to demonstrate the isotropic expansion of the structure to be analysed.
Bibliography
1. Schermelleh, L., et al. (2010). “A guide to super-resolution fluorescence microscopy.” Journal of Cell Biology 190(2): 165-175.
2. Schermelleh, L., et al. (2019). “Super-resolution microscopy demystified.” Nature Cell Biology 21(1): 72-84.
3. Chen, F., et al. (2015). “Expansion microscopy.” Science 347(6221): 543-548.
4. Zhang, C., Kang, J. S., Asano, S. M., Gao, R., & Boyden, E. S. (2020) “Expansion microscopy for beginners: Visualizing microtubules in expanded cultured HeLa cells.” Current Protocols in Neuroscience,
5. Chozinski, T. J., et al. (2016). “Expansion microscopy with conventional antibodies and fluorescent proteins.” Nature Methods 13(6): 485-488
6. Tillberg PW, Chen F, Piatkevich KD, et al. (2016) “ Protein-retention expansion microscopy of cells and tissues labeled using standard fluorescent proteins and antibodies. ” Nat Biotechnol. 34 (9):987-992.
7. Ku T, Swaney J, Park JY, et al. (2016 ) “Multiplexed and scalable super-resolution imaging of three-dimensional protein localization in size-adjustable tissues.” Nat Biotechnol. 34 (9):973-981. doi:10.1038/nbt.3641
8. Chen, F., et al. (2016). “Nanoscale imaging of RNA with expansion microscopy.” Nature Methods 13(8): 679-684
9. Chang, J.-B., et al. (2017). ” Iterative expansion microscopy.” Nature Methods 14(6): 593-599.
10. Gambarotto, D., et al. (2019). “Imaging cellular ultrastructures using expansion microscopy (U-ExM).” Nature Methods 16(1): 71-74
11. Pernal, S. P., et al. (2019). “Differential expansion microscopy.” bioRxiv: 699579.
12. Truckenbrodt, S., et al. (2018). “X10 expansion microscopy enables 25-nm resolution on conventional microscopes.” EMBO reports 19(9): e45836.
13. Truckenbrodt, S., et al. (2019). “A practical guide to optimization in X10 expansion microscopy.” Nature Protocols 14(3): 832-863.
14. Wassie, A. T., et al. (2019). “Expansion microscopy: principles and uses in biological research.” Nature Methods 16(1): 33-41
 (No Ratings Yet)
Write a Tools post
Create an account or log in to post your story on FocalPlane.
More posts like this

Filter by
- NewsApply
- DiscussionsApply
- How toApply
- ToolsApply
- Case studiesApply
- InterviewsApply
- JobsApply
- EducationApply
- Blog seriesApply
- Volume EMApply
- Latin American Micro..scopistsApply
- Bio-image Analysis w..ith NapariApply
- Imaging with…Apply
- Towards Global Acces..sApply
- Latin America Bioima..gingApply
- From Zero to Qupath ..HeroApply
- Asian Microscopists ..and Cell BiologistsApply
- AIC at HHMI JaneliaApply
- Deep Learning for Bi..o-image analysisApply
- GloBIAS – updates fr..om the communityApply
- WAMBIAN: West Africa.. in FocusApply
- Highlights from Euro..-BioImagingApply
- LSFM seriesApply
- DIY MicroscopyApply
- View all