Protein micropatterning: beauty standards in cell culture
Posted by Julius Winter, on 16 February 2022
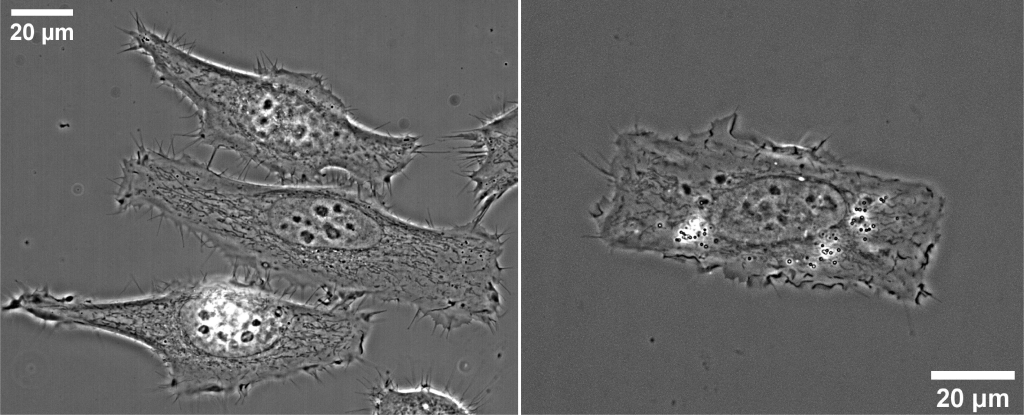
When imaging cells grown on a flat substrate, such as a glass coverslip, we quickly admire the diversity of morphologies different cells can take on. Some cells, such as COS7, will take on a flat “pancake”-like shape, which makes it easy to image its organellar structure in a 2D plane. On the other hand, a MEF cell tends to form elongated, narrow morphologies, creating an interconnected network with its neighbors. The choice of cell type for your study may quickly be made according to a cell’s morphology in culture.
A major issue we face with cells in culture is that they are kept outside of a natural and environmental context. A cell grown on a glass cover slip is deprived of any environmental cues it would usually find inside an organism. The fact that the surface functionalization and physical constraints a cell experiences in vivo shape its function, comes at no surprise1.
Another issue we face when working with cells in conventional cell culture is the heterogeneity of cell shapes. This becomes a problem when we want to compare intracellular dynamics of organelles in cells with completely different morphologies. Regions defined, for example, as peripheral or perinuclear can look very different from cell to cell.
Gaining control over a cell’s morphology would allow us to address parts of these issues. As adherent cells interact with a multitude of proteins on surfaces, these mechanisms can be exploited to make cells interact with surfaces in a very specific way. This way physical and chemical stress can be imposed on the cells to simulate a more natural environment. Additionally, the cells can be coaxed into attaching to surfaces more predictably, creating morphologically similar populations of cells as compared to non-engineered surfaces.
This technique of protein micropatterning, to functionalize surfaces with specific proteins and in defined shapes, was first made popular by using polydimethylsiloxane (PDMS) stamps2. These stamps were used to literally print proteins onto substrates. Here we discuss a further evolution and simplification of this process of printing proteins on surfaces. In this method we use deep UV light to directly transfer a pattern to the culture surface that is then functionalized with a protein of choice3,4. This method skips the need for a PDMS casting station but in turn requires a deep UV illumination chamber. Depending on the laboratory environment either method may be more convenient for you.
How is it done?
Working with the deep UV patterning technique does not require much equipment but one tool is indispensable, the deep UV illumination chamber. This can be a commercially available UV ozone oven, such as the Jelight UVO cleaner, referenced by Azioune et al.3 and used by us. If on a budget, you can alternatively build a system yourself, following the safety measures associated with ozone generating systems.
The other important component is the photomask with the desired patterns. Masks can be made yourself in an appropriate microfabrication facility or ordered online. Glass masks must be made from quartz glass, as regular soda-lime glass is opaque to deep UV light.
The main chemical reagents required for micropatterning are PLL-g-PEG, which acts as a cell-repellent coating on the cover slips, the protein of choice, such as fibronectin, and a HEPES and NaHCO3 buffer for the PLL-g-PEG and fibronectin solutions respectively.
Simplified protocol
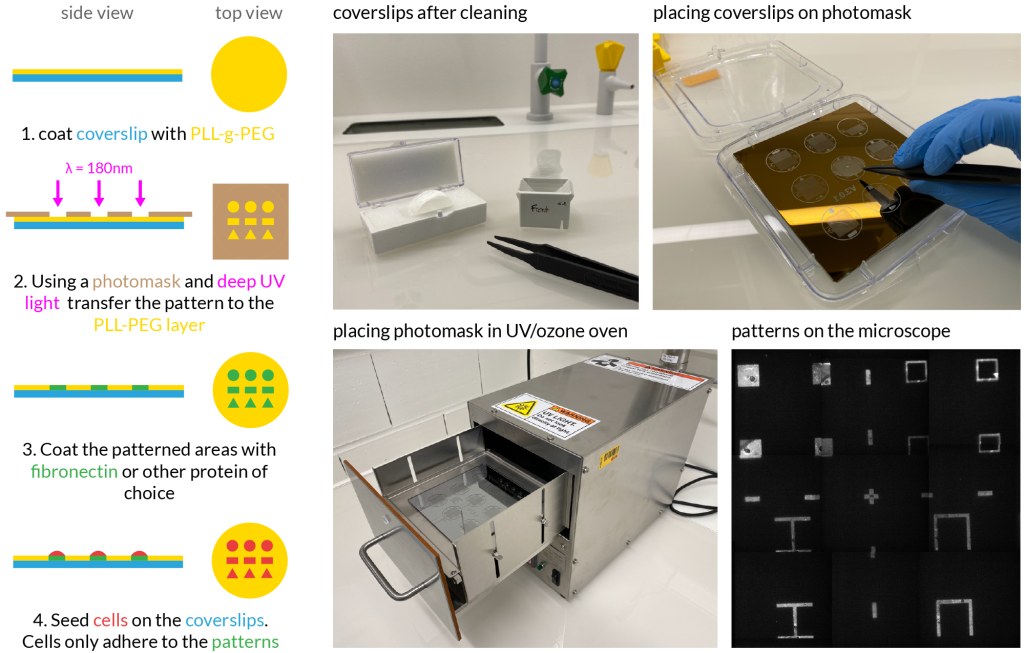
The protocol to make protein patterned coverslips consists of three main steps shown in Figure 2. This is a shortened version of the full protocol by Azioune et al.3
First a clean glass coverslip is coated with 0.1mg/ml PLL-g-PEG in 1mM HEPES pH 7.4 by placing the coverslip upside down onto a piece of parafilm with the solution. After one hour the coverslip is dried with under air flow.
In the second step the actual patterns are transferred to the coverslips. The coverslips are placed onto the mask and to ensure tight contact a minimal amount of water is added between the two. Afterwards the UV ozone oven is used to expose the coverslips by 180nm UV light. The coverslips are again dried after this step.
In the final step the exposed parts of the coverslips are coated in the protein of choice. Fibronectin makes a great protein to start experimenting with. As in step 1, the coverslip is placed, PLL-g-PEG-face down, onto a piece of parafilm with 25µg/ml fibronectin in 100mM NaHCO3 pH 8.5. After one hour the coverslips are transferred to a multi-well plate to rinse with PBS.
At this point the coverslips are fully patterned and can be populated with your cells of choice. The recommendation by Azioune et al. is to seed 10’000 cells/cm2. This number clearly depends on the density of patterns on the coverslip and we seed around half that amount at 20’000 – 25’000 cells per 25 mm coverslip. To avoid having multiple cells on one pattern it is recommended to exchange the medium 1-2 h after seeding the cells. This removes all unattached cells. At this point the cells can be imaged and will continue spreading to fully cover the individual patterns.
Some variations
The method described above was first introduced in 2009 but remains very simple to use with little specialized equipment. Nonetheless, there have been further interesting developments in UV micropatterning. Using a benzophenone photosensitizer enables micropatterning with lower energy UV light, for example on a microscope. In combination with a spatial light modulator on the microscope, patterns can be transferred without the use of a quartz photomask5. Sequential protein patterning becomes more accessible as well, as there is no need for tedious alignment of multiple photomasks. The lithography, patterning and washing steps can all be handled on the microscope.
Another addition to the toolbox is the use of so-called fibrinogen anchors to pattern a surface with virtually any protein of choice6. As surface adsorption quality can vary from protein to protein, the use of a common anchor, such as fibrinogen, can solve this issue. The fibrinogen is functionalized such that it can recognize common protein tags. This modified fibrinogen is then used in the place of fibronectin in the above protocol.
What can you do with micropatterned cells?
The most common application for micropatterning has been in understanding the effect of certain geometries on cell function and proliferation. Micropatterns have helped researchers to understand how the mitotic spindle is oriented in dividing cells7,8, how the plasticity of the cytoskeleton contributes to cell spreading9, how cell-cell junctions are positioned10, and how cell shape influences the differentiation of stem cells1,11.
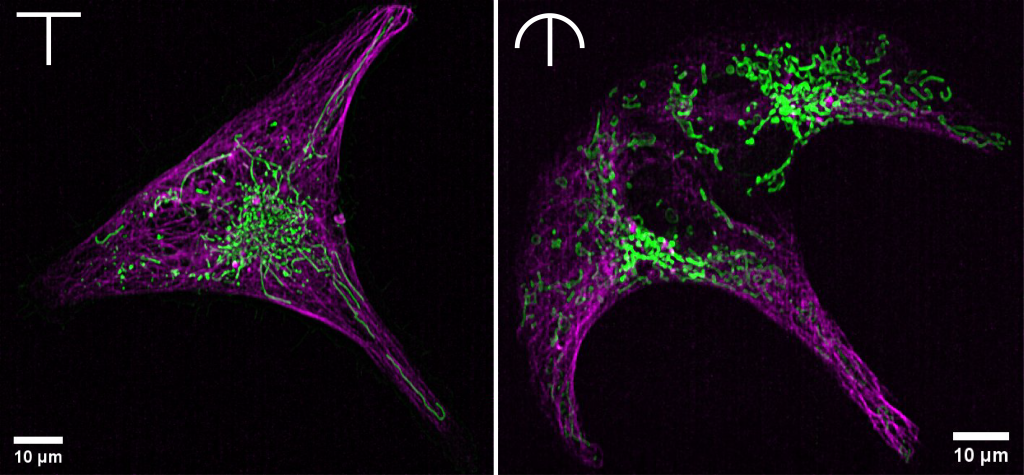
The idea to use protein micropatterning in Prof. Dr. Suliana Manley’s lab came from the desire to define subcellular zones more clearly. We are curious about how mitochondrial dynamics vary in different parts of the cell and what subcellular interactions precede these processes. The “standardized” cells give us the opportunity to confidently compare dynamics in different cells, which we were not able to in the past.
The possibilities for different patterns are near limitless and open the door for more mechanistic cell biological investigations. Interactions between cells can be clearly orchestrated. Primary cells can be kept constrained in a shape that resembles their natural environment. The migration of cells on a specific path or following a chemical gradient in a microfluidic device can be observed. The influence of cell shape on subcellular structures is also far from being fully explored.
Some things to keep in mind
While setting up our workflow for the micropatterns we encountered a few hiccups along the way, not previously mentioned in the protocols.
Quartz glass mask
The first thing, which is described in the original protocol, but we would like to mention again, is the need for the mask to be made from quartz glass. The common glass found in clean rooms is soda-lime, which is opaque to UV light and cannot be used for the type of patterning presented here.
Mask design
The optimal pattern size and distribution proved to be highly dependent on the cell type. Even cells that look similar in regular cell culture may act very differently when exposed to protein patterns. Generally, when working with cells that do not migrate, patterns can be very close to one another (< 50 µm) with the only problem being that a cell may stretch from one pattern to another, spanning them both.
One goal for us was to stretch and flatten cells as far as possible, working with patterns of surface areas up to 4000 µm². Large patterns only consisting of the outline with low aspect ratios such as circles, squares or higher polygons proved to be difficult for cells to cover. Higher aspect ratio shapes of the same surface area, such as rectangles, narrow triangles and alike showed consistently better coverage with single cells. In general, trying to push cells to be fully flat is possible but is difficult and often ends with multiple cells covering a single pattern.
Seeding and treating cells
This leads us to a final point being our goal to have one cell per pattern as often as possible. Getting single cell coverage is a tricky task and needs tweaking for each cell type. In an ideal case you seed just enough cells to, on average, have one per pattern. Exchanging the medium between 1-3 hours after seeding the cells helps avoid accumulations on the patterns. We found this to be an essential step but the timing between seeding and washing not to be overly crucial. We often seed and wash the cells the evening before an imaging experiment to get a maximum of cell spreading but also avoiding the division of too many cells. A thing to note about washing cells on patterns is the risk of dewetting the surface. We noticed that washing with PBS most often dewets the surface, killing all the cells. We now just use fresh medium to wash dyes or perturbant out of the cells and do not experience surface dewetting anymore.
Conclusion
Protein micropatterning is an easy way of introducing cell shape, be it a natural shape or unconventional shape, into your cell experiments. It has already led to fascinating findings around cytoskeletal organization and its influence on cell development. It continues to do so by showing us how organelles interact in different subcellular regions of a cell. There are several micropatterning techniques out there and one may be more accessible to you than another. If patterned cells fit into your scientific question, it’s well worth taking a closer look and giving it a try.
Acknowledgements
I would like to thank Suliana Manley and Jenny Sülzle for their generous feedback on this text, as well as Esperanza Agullo-Pascual for the kind invitation and help publishing this post.

Julius Winter, PhD student
Laboratory of Experimental Biophysics (Manley Lab)
École Polytechnique Fédérale de Lausanne, Switzerland
References
1. Kilian, K. A., Bugarija, B., Lahn, B. T. & Mrksich, M. Geometric cues for directing the differentiation of mesenchymal stem cells. Proc National Acad Sci 107, 4872–4877 (2010). https://doi.org/10.1073/pnas.0903269107
2. Ruiz, S. A. & Chen, C. S. Microcontact printing: A tool to pattern. Soft Matter 3, 168–177 (2006). https://doi.org/10.1039/B613349E
3. Azioune, A., Carpi, N., Tseng, Q., Théry, M. & Piel, M. Chapter 8 Protein Micropatterns A Direct Printing Protocol Using Deep UVs. Methods Cell Biol 97, 133–146 (2010). https://doi.org/10.1016/S0091-679X(10)97008-8
4. Azioune, A., Storch, M., Bornens, M., Théry, M. & Piel, M. Simple and rapid process for single cell micro-patterning. Lab Chip 9, 1640–1642 (2009). https://doi.org/10.1039/B821581M
5. Strale, P. et al. Multiprotein Printing by Light‐Induced Molecular Adsorption. Adv Mater 28, 2024–2029 (2015). https://doi.org/10.1002/adma.201504154
6. Watson, J. L. et al. High-efficacy subcellular micropatterning of proteins using fibrinogen anchors. J Cell Biol 220, (2021). https://doi.org/10.1083/jcb.202009063
7. Shah, J. V. Cells in tight spaces: the role of cell shape in cell function. J Cell Biology 191, 233–236 (2010). https://doi.org/10.1083/jcb.201009048
8. Fink, J. et al. External forces control mitotic spindle positioning. Nat Cell Biol 13, 771–778 (2011). https://doi.org/10.1038/ncb2269
9. Kassianidou, E. et al. Extracellular Matrix Geometry and Initial Adhesive Position Determine Stress Fiber Network Organization during Cell Spreading. Cell Reports 27, 1897-1909.e4 (2019). https://doi.org/10.1016/j.celrep.2019.04.035
10. Tseng, Q. et al. Spatial organization of the extracellular matrix regulates cell–cell junction positioning. Proc National Acad Sci 109, 1506–1511 (2012). https://doi.org/10.1073/pnas.1106377109
11. Miroshnikova, Y. A. et al. Adhesion forces and cortical tension couple cell proliferation and differentiation to drive epidermal stratification. Nat Cell Biol 20, 69–80 (2018). https://doi.org/10.1038/s41556-017-0005-z
 (No Ratings Yet)
Write a ‘How to’ post
Create an account or log in to post your story on FocalPlane.
More posts like this

Filter by
- NewsApply
- DiscussionsApply
- How toApply
- ToolsApply
- Case studiesApply
- InterviewsApply
- JobsApply
- EducationApply
- Blog seriesApply
- Volume EMApply
- Latin American Micro..scopistsApply
- Bio-image Analysis w..ith NapariApply
- Imaging with…Apply
- Towards Global Acces..sApply
- Latin America Bioima..gingApply
- From Zero to Qupath ..HeroApply
- Asian Microscopists ..and Cell BiologistsApply
- AIC at HHMI JaneliaApply
- Deep Learning for Bi..o-image analysisApply
- GloBIAS – updates fr..om the communityApply
- WAMBIAN: West Africa.. in FocusApply
- Highlights from Euro..-BioImagingApply
- LSFM seriesApply
- DIY MicroscopyApply
- View all