Sharing Your Poster on Figshare: A Community Guide to How-To and Why
Posted by Elisabeth Kugler, on 26 July 2023
Many aspects of science are moving towards open science, championing transparency, collaboration, and accessibility in research. Through sharing data, methods, findings, and teaching materials openly, researchers foster a more robust and impactful scientific community.
At the forefront of this initiative are platforms that support this movement. For example, Figshare is a repository empowering scientists to make their outputs citable, shareable, and discoverable.
In this blog, we will explore the benefits of sharing your research by providing a step-by-step walkthrough on how to share your work (e.g. posters, data, ..) on Figshare. Specifically, we want to encourage you to upload your posters of conferences and events, and so this post is written in the context of the Physics of Life PoL TU Dresden Bio-Image Analysis Symposium 2023.
I. Understanding the Importance of Open Science
Open science holds numerous benefits for researchers, institutions, and the wider scientific community. Researchers gain increased visibility and recognition for their work, while institutions benefit from enhanced reputation and potential collaborations.
Open data sharing plays a pivotal role in fostering collaboration and accelerating scientific progress. Articles with openly shared data are associated with increased citations, indicating a positive impact on research visibility and influence. Articles published Open Access receive 18% more citations than average [1]. For conference posters, it is often the case that they are shown and discussed at a conference, but are never shared with an audience beyond the conference attendees, and therefore fall into oblivion. So why not claim your research and share it with a wider audience by sharing your conference poster on a repository?
Sharing your work is also an essential aspect of open science towards FAIR principles data management. Striving for data to be Findable, Accessible, Interoperable, and Reusable enables effective data organization, fostering collaboration, and facilitating research reproducibility. One important step towards that are Digital Object Identifiers (DOIs), a type of persistent identifier (PID), which play a key role in open science as these allow to cite any kind of published content. Another important tool is ORCID, which stands for Open Researcher and Contributor ID, which is an alphanumeric code to uniquely identify authors and contributors of scholarly communication. So instead of a name, works can be linked via this number, making it easier for publications with different names or spellings to be associated with the correct author.
In this landscape of open science, having the correct infrastructure for a transparent, collaborative, and efficient scientific exchange is key. One such example of effective infrastructure is Figshare, where “Figshare is a repository where users can make all of their research outputs available in a citable, shareable and discoverable manner” [2].
II. Getting Started with Figshare
In the following sections, we walk you through how to share your content on Figshare.
Firstly, you will need to set up an account – to get started, follow these simple steps:
- Look for the “Sign Up” option in the top right corner of the Figshare homepage.
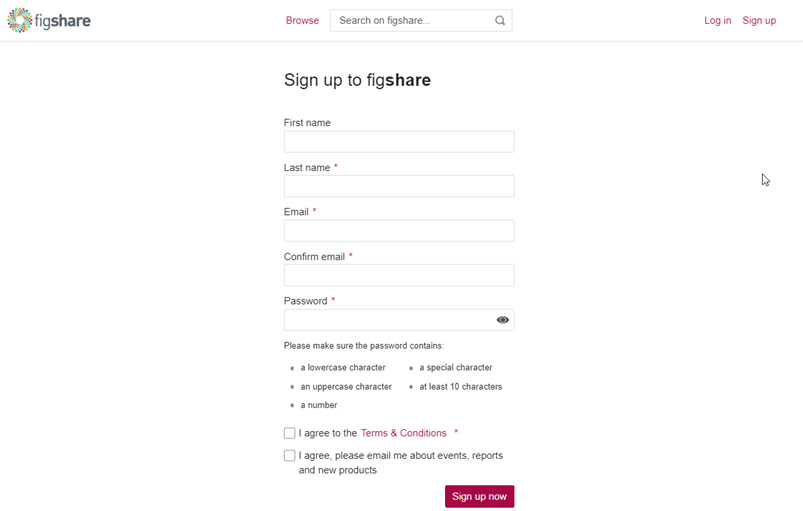
- Click on “Sign Up” and provide your name and email address.
- Read and agree to Figshare’s Terms and Conditions.
- Check your email inbox for a verification message from Figshare.
- Click on the verification link in the email to confirm your email address.
- Return to Figshare and click on “Login” using the details you just registered.
Congratulations! You now have your own Figshare account.
III. Uploading Data and Research Outputs to Figshare
Once you’re logged in, take advantage of the easy upload process.
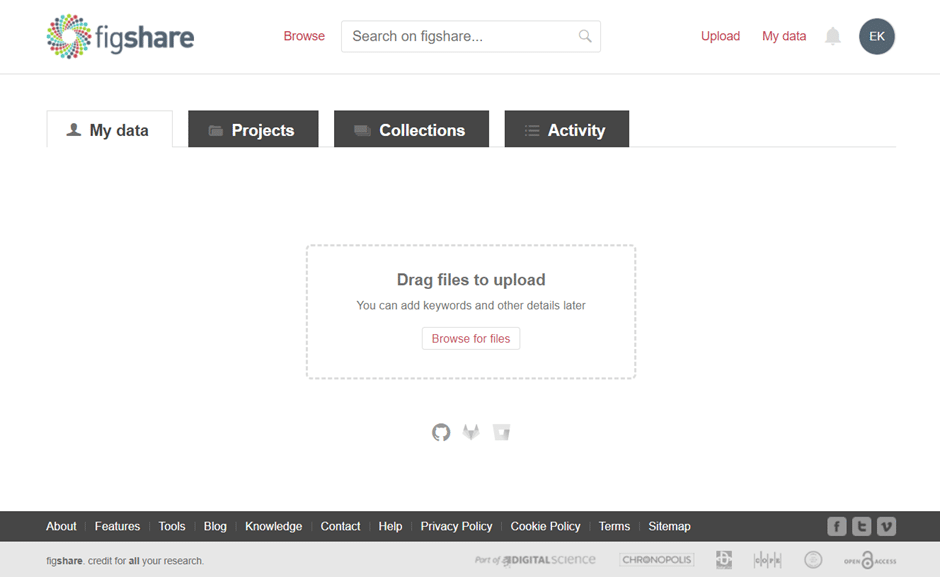
If you just created an account and have nothing uploaded: In the “My data” section, you can either “Drag and Drop” your files directly into the outline box on your screen or use the “Browse for Files” option in the “My Data” tab to find and upload your files.
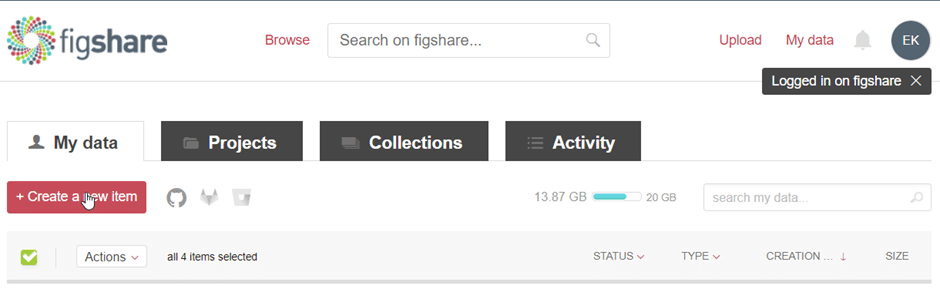
If you already have an account and some uploaded content: In the “My data” section, select the “+Create a new item” button from the top left or drag and drop it into your browser.
Insert the basic information:
- Title: Figshare has a guide on how to optimize your basic data information. If unsure, you can also click on the ‘i’ icon to the right of each field.
Please note: If you use Figshare via your Institutions, you may see a field called Group.
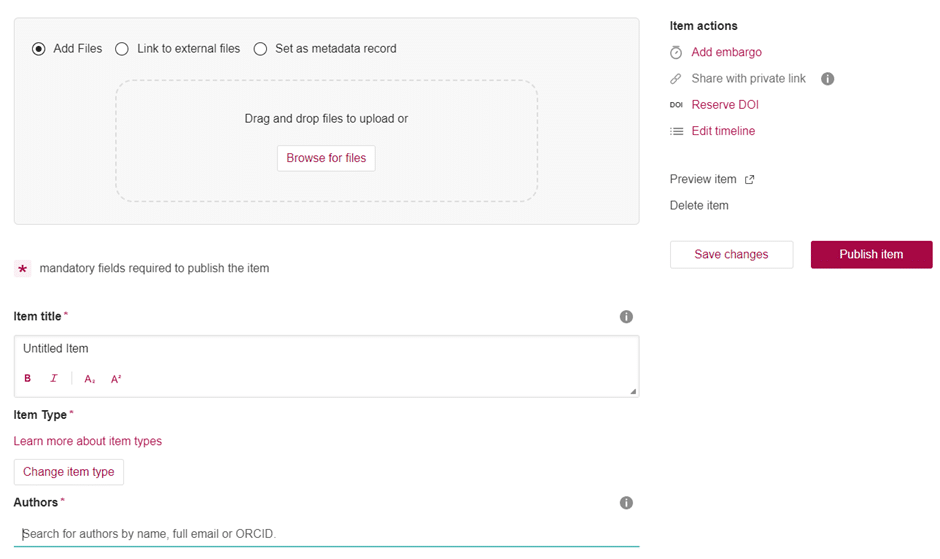
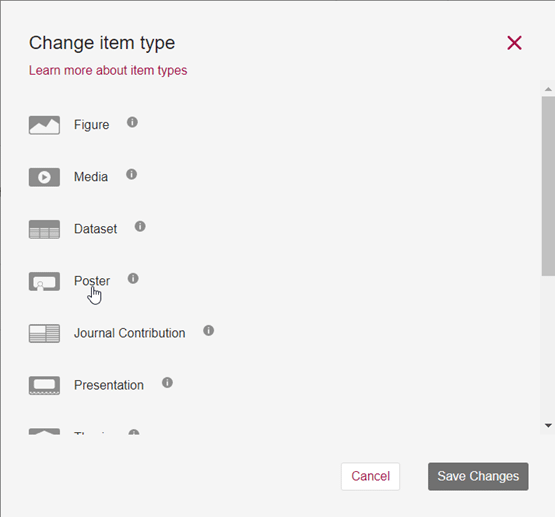
2. Item type: Select the type of item from the drop-down menu. We accept any file type (in this case “Poster”) and preview over 1,200 file extensions (pptx, pdf, png, etc.) in the browser. For poster, it is typical to have one file which has a high enough resolution to allow zooming, however you might want to break up your poster in multiple images for readability (e.g. introduction, methods, etc.).
3. Authors: Fill in all author names. After you fill them in, you can rearrange the order of appearance.
Note: Encourage your co-author to set up a Figshare account and link their ORCID.
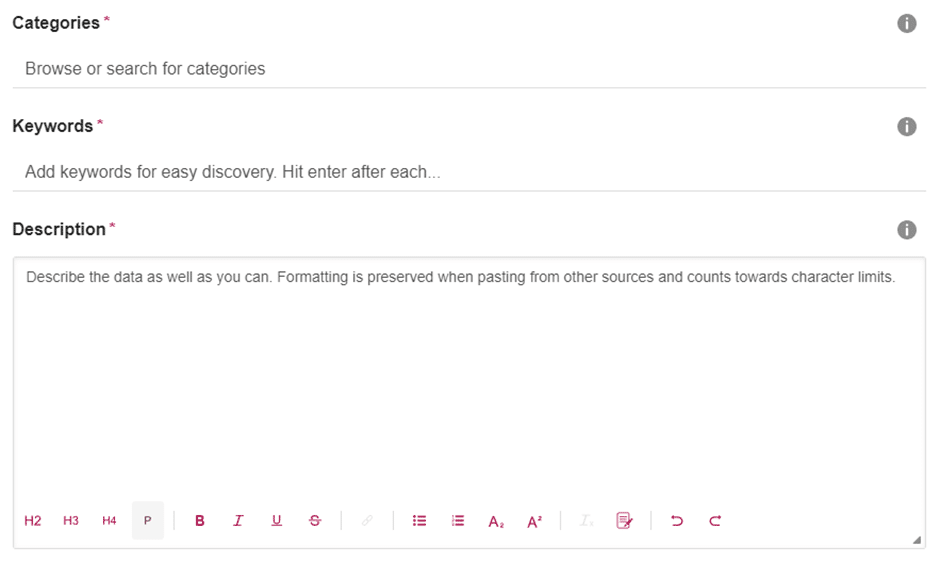
4. Category: Choose the appropriate categories for your uploaded content. Importantly, you can choose multiple categories in case your work applies to more than one.
5. Keyword(s): Use specific keywords that add to the description of your content. This helps users to find your work, but also to understand the context of the work better.
6. Description: Use this long-form entry box to describe your uploaded content as best as you can. Include methods, meta-data, licences or requirements (e.g. legal, ethical,..), as well as other necessary context.
The last few steps:
– The finish line comes into view.
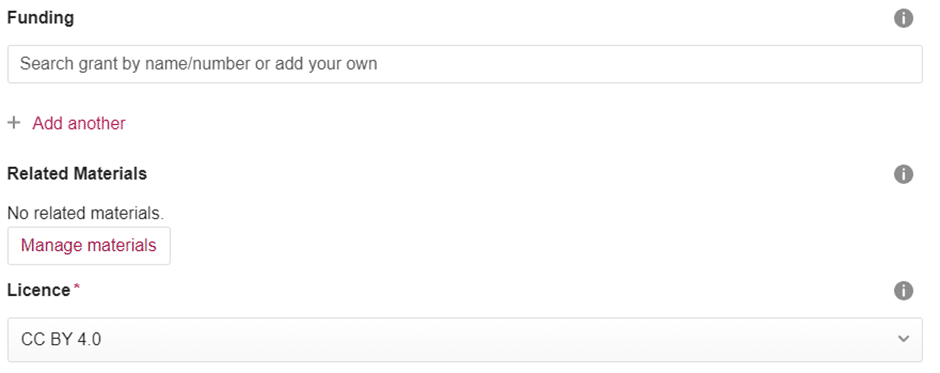
1. Funding: When typing, Figshare will provide suggestions. If your funder does not appear, just write your funder without selecting any of the Figshare suggestions from the drop-down menu.
2. Related Materials: This is our favourite section! Here, you can add materials that relate to your uploaded content. This can include a paper that used these figures, code to analyse data or another dataset.
3. License: Licences might seem daunting at first, but they are critical to establishing how your content can be (re)used. Figshare has a great guide to describe what different licences allow. Also, make sure to read the FocalPlane post about licencing your work by Robert Haase [3].
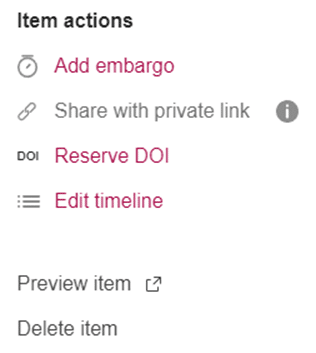
Item actions in the upper right part of the screen:
You have done all the hard work and these last few steps just round it off.
1. Embargo: You can share your data with an embargo and create a private link for sharing. This is a great option when submitting work to peer review or thesis submissions where work might be embargoed. For poster for example, you can create the upload before the conference and embargo until after the conference.
2. Reserve DOI: By selecting this, your content receives a ready-to-use DOI that will lead to your work.
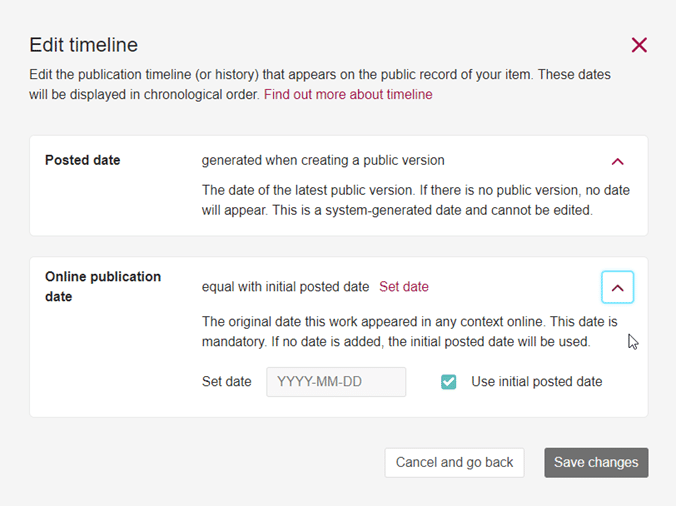
3. Edit the timeline: You can change the timeline to set or change the date ‘Online publication date’. This is the information used for citations.
4. Publish Item (or Submit for review for institutions with a review workflow).
When hitting “Publish Item” you are prompted to check the license you selected and agree to the Figshare terms of use. Make sure that everything you submitted is correct, as it cannot be deleted, once it is published.
IV. Citing and Attributing Data from Figshare
When using data from Figshare in your research papers or publications, it is essential to provide appropriate citations and attribution to acknowledge the data creators. The citation format includes the following elements:
- Author(s) or Creator(s) of the dataset
- Year of publication or upload
- Dataset title
- Publisher (FigShare)
- DOI (Digital Object Identifier) or URL
Example Citation Format:
Haase R. et al (2018). „A study on long-term reproducibility of image analysis results on ImageJ and Fiji”. FigShare. https://doi.org/10.6084/m9.figshare.7409525.v1
V. Important things to keep in mind
Now that you have an account, you can share datasets, presentations, posters, and other supplementary material on Figshare. But before you do, we want you to keep the following points in mind.
- Make sure to create a DOI for your uploaded work, and, if needed, protect your work with an Embargo.
- Once your data is published the DOI can be shared for publication. Public data can also be shared on social media or private sharing links can be generated to share your private data.
- The free version limit is 20GB. If you need more, check if your institution has a licence, or contact Figshare for more information.
- If you want to upload larger datasets, you might want to consider an upload via FTP or API. As this is a specific use case, we want to cover this here. But you can contact the Figshare team for support.
- When sharing data and other research works, always make sure that your data does not breach the ‘Data Protection Act’ and that any Health/Identity information is removed.
Conclusion
Open science is a revolutionary movement that aims to make scientific research and data accessible, transparent, and collaborative. By adopting open science principles, researchers contribute to the advancement of knowledge, foster innovation, and address global challenges more effectively. Figshare, as a leading open data platform, plays a pivotal role in facilitating open science and offers numerous benefits to researchers worldwide.
Additional Resources and References
[1] H. Piwowar et al., “The state of OA: a large-scale analysis of the prevalence and impact of Open Access articles,” PeerJ, vol. 6, p. e4375, Feb. 2018, doi: 10.7717/peerj.4375.
[2] “about figshare.” https://knowledge.figshare.com/about#offering (accessed Jul. 20, 2023).
[3] R. Haase, “If you license it, it’ll be harder to steal it. Why we should license our work,” FocalPlane, May 06, 2023. https://focalplane.biologists.com/2023/05/06/if-you-license-it-itll-be-harder-to-steal-it-why-we-should-license-our-work/ (accessed Jul. 24, 2023).
- Figshare: https://figshare.com/
- FAIR Principles: https://www.go-fair.org/fair-principles/
- FTP/API large data upload: https://help.figshare.com/article/how-to-upload-and-publish-your-data
- Optimize basic information: https://figshare.com/articles/dataset/How_to_make_the_most_out_of_your_metadata/3824118/3
- Figshare licence information: https://help.figshare.com/article/what-is-the-most-appropriate-licence-for-my-data
- FocalPlane post about licencing by Robert Haase: https://focalplane.biologists.com/2023/05/06/if-you-license-it-itll-be-harder-to-steal-it-why-we-should-license-our-work/
Authors: Dr Elisabeth Kugler (Twitter | Zeeks – Art for Geeks Ltd).
Acknowledgement: We thank Dr Robert Haase (Twitter | PoL TU Dresden) for reading this post and providing feedback.
Written in the context of the Physics of Life PoL TU Dresden Bio-Image Analysis Symposium 2023.
 (1 votes, average: 1.00 out of 1)
Get involved
Create an account or log in to post your story on FocalPlane.
More posts like this

Filter by
- NewsApply
- DiscussionsApply
- How toApply
- ToolsApply
- Case studiesApply
- InterviewsApply
- JobsApply
- EducationApply
- Blog seriesApply
- WAMBIAN: West Africa.. in FocusApply
- Volume EMApply
- Latin American Micro..scopistsApply
- Bio-image Analysis w..ith NapariApply
- Imaging with…Apply
- Towards Global Acces..sApply
- Latin America Bioima..gingApply
- From Zero to Qupath ..HeroApply
- Asian Microscopists ..and Cell BiologistsApply
- AIC at HHMI JaneliaApply
- Deep Learning for Bi..o-image analysisApply
- GloBIAS – updates fr..om the communityApply
- Highlights from Euro..-BioImagingApply
- LSFM seriesApply
- DIY MicroscopyApply
- View all