behind DeXtrusion: an automated pipeline to detect epithelial cell extrusion through machine learning
Posted by alvillars, on 6 October 2023
The problem
In animals, epithelial tissue covers most of our organs. In order to create the very intricate and complex shapes of these organs, these tissues are drastically remodelled during embryogenesis through growth and shape changes. Once they achieve these final shapes, they maintain their cell number in a dynamic equilibrium. Both of these mechanisms, morphogenesis and homeostasis, rely on the tight spatio-temporal regulation of cellular events such as cell division and cell death. Typically, researcher have been relying heavily on the use of microscopes and live imaging to produce the datasets necessary to study these events. With such a large amount of data it becomes at the very least, very laborious, or even virtually impossible to detect and position all these events manually. To overcome these issues, Gaëlle Letort and myself have developed a supervised machine-learning pipeline called DeXtrusion (https://doi.org/10.1242/dev.201747) [1]. DeXtrusion is open source and is made available (https://gitlab.pasteur.fr/gletort/dextrusion) along with our trained neural networks, scripts (Jupyter notebooks and Fiji macros) and all training data (https://doi.org/10.5281/zenodo.7586394).
The story behind the development of DeXtrusion.
The whole idea behind the development of DeXtrusion started after seeing how cumbersome it was for Léo Valon (research in the lab of Romain Levayer) to detect and position extrusions by clicking them on movies of the drosophila pupal notum for his project. It only became worse when I also had to do it for my project. In this tissue that we are looking at in the lab, roughly a thousand of cell extrusions happen in a period of 12h. While these cells extrude mostly in a stereotyped pattern (movie1), a series of multiple spatio-temporal feedbacks ensures that they are spread apart enough so that the epithelium sealing is maintained. As a result, while there are regions prone to extrusion, the local distribution is overall random which makes it laborious to find and position extrusions in a precise manner, specifically when comparing different conditions.
The classical approach in the field to solve such a problem is usually to segment the whole field of view to systematically track all cells and identify the extruding ones. While the rise of machine-learning has greatly enhanced segmentation [2],[3], it stills represents an important amount of work specifically for large field of view that are tracked over long timescales which was exactly our situation. Moreover, I was focusing on the decision events leading to cell extrusion and the subsequent remodelling. Therefore, we only needed the segmentation of these cells and their close neighbours and were not willing to segment whole tissues.
The idea was here, and I was trying different approaches with honestly very little success. And that’s when the COVID pandemic hits us. Although COVID had many negative effects for me, it freed up a lot of time since I couldn’t do any more experiments and ran out of data to analyse. I used that time to learn a little bit more about machine learning and focused on this side project.
We had generated a consequent amount of training data by positioning all these cells in the movies (all open access https://doi.org/10.5281/zenodo.7586394). I used this and developed the model during the lockdown in France. When things opened again, that’s when I was joined by Gaëlle Letort. She really pushed the project a step further. She made the whole architecture around the model to run the pipeline on full movies from different microscopes and she made it usable by other people by creating the interface.
An automatise pipeline to detect cellular events
The core of the pipeline: DeXNet.
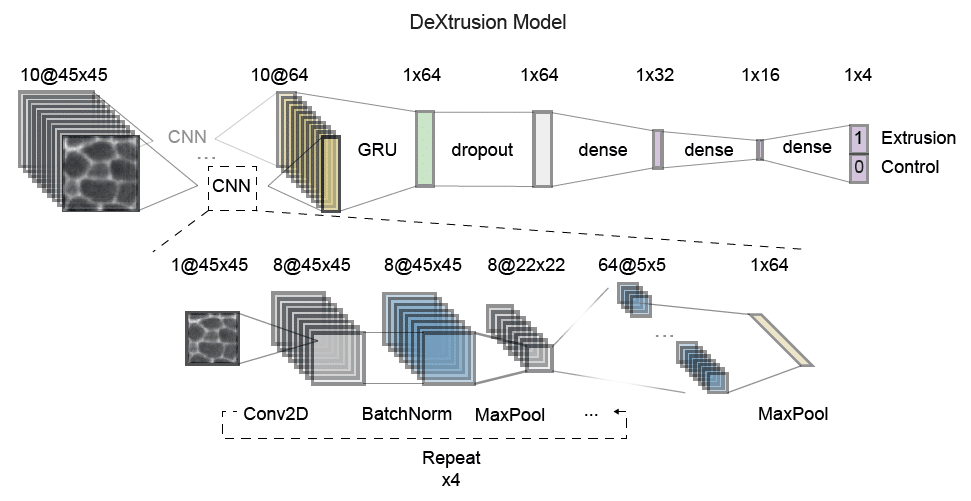
Our pipeline DeXtrusion relies on DeXnet, a combination of Convolutional Neural Network that encodes the image and a Gated Recurrent Unit which takes into accound the time information. This network (DeXnet) was trained on sequences of 10 images of 45 by 45 pixel each. In our reference scale these images were separated by 5min intervals and contain roughly 3-4 cells. This allows to have enough information to recognise cellular events. The DeXtrusion pipeline, then applies this approach to complete movies by applying the model on sliding windows of 45×45 pixels with 50% overlap. The prediction then generates a first output in the form of a probability map. This can be used to visually screen the predicted events. This probability map is then thresholded in space and time to only keep high probability events (more likely to be true events). The resulting 3D mask of positive detections is then thresholded again to filter out false positive based on the volume size of these positive detections (therefore filtering out short events that don’t fit the typical duration of extrusions, divisions, etc…). Finally by taking the centroid of these high-probability volumes we create the second output as a list of point (ROIs) compatible with fiji. Here we will focus on the usability of the pipeline and how to set different parameters according to the user’s needs.
Application of DeXtrusion.
DeXtrusion is distributed as a python module. We recommend to install it in a virtual environment to be sure to have the required versions. DeXtrusion can be installed either manually through the setup file or with pip. The exact steps to follow are detailed in the gitlab attached to the paper (https://gitlab.pasteur.fr/gletort/dextrusion).
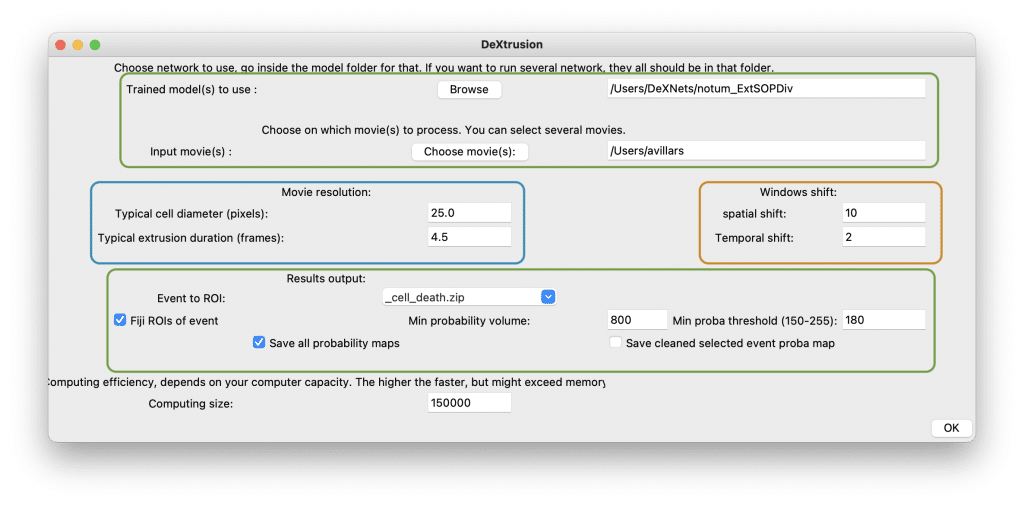
Once the different models are downloaded (see gitlab) and the environment is set-up, the user needs to activate it. Then one can decide to use our user interface or to use a set of jupyter notebook. The first case opens a user interface which allows to tune different model parameters to the user’s needs (fig2). The first input is the model selection (fig2. top green square). To use only a single model you just need to select the folder for this model. Averaging two models typically yields better results with less false positives (altough it may take more time to run the prediction). For this, all models needs to be in a single folder. Finally, the user can select the input movie, so far we only support single channels 2D movies (xyt).
In order to get the best prediction, the input movie needs to be rescaled spatially and temporally to fit the training data. This is done under the “movie resolution” part (fig2. left blue square). To make this easy we have provided the user with two parameters to set. The first one, the typical cell diameter (by default set to 25.0 pixel in our movies) allows to rescale the movie spatially. This needs to be changed according to the movie pixel size and corresponding cell diameter. Similarly, to rescale the input movie temporally the user need to input the typical event duration observed in the movie (in frames unit). This value depends on the frame rate and drastically impact the quality of prediction. On the other end, the ”window shift” part (fig2. right orange square) allows to fine-tune the resolution of the prediction. Smaller spatial and temporal shift leads to more fine probability maps at the expanse of computation time. We would recommend to increase the resolution once the user has optimize all other parameters first.
Under the “results output” part (fig2. bottom green square), one can select the type of events to predict and transform to a list of ROIs. As mentioned previously, the probability output is then transformed to a point output through two thresholds which can be tuned here. The min probability volume allows to only keep probability volume bigger than the size inputed by the user (in pixel). On the other hand the min proba threshold filters out any probability value bellow the threshold set by the user. This value is set between 0 and 255 because the probability map output is a 8bit image and thus the probability value (between 0 and 1) is rescaled between 0 and 255. After that, the user can select which outputs need to be saved (ROIs, all probability maps and the probability map cleaned up to keep only positive events).
Finally, the user can set the computing size according to its machine power. The bigger the computing size, the faster. However, this means fitting more images into memory which can exceed memory and stop the process.
Manual correction of the results and retraining
Our overall precision on test movies ranges from ∼0.8 to 0.9 and thus still requires a manual correction phase to filter out false positives. For this Gaelle has written a set of ImageJ/Fiji macro which allows to screen through all prediction and to select whether or not each event is indeed the desired event or not by simply pressing y or n (fig3).

Finally, if the number of False positive and/or False negative are too high the model may need to be finetuned to fit your data or you may need to train the model again from scratch. This can be done using the two jupyter notebook in the repository (gitlab). If you are trying to train from scratch please use deXtrusion_TrainNetwork.ipynb. All explanation can be found within the notebook itself. In short, the user needs to provide annotated data (movies + annotated events ROIs) in the format mymovie.tif associated with the corresponding ROIs in .zip format i.e, mymovie_cell_death.zip. Control positions will be automatically generated randomly However, if you want to enforce some position as being control windows (for example to reduce the false positive rates), you can add them in a file mymovie_nothing.zip and set the parameter add_nothing_windows to a positive value.
Conversely, if the model performs relatively correctly, one can use the already trained network as a starting point and provide new training data. This will make the model more performant on these new datasets and this can be done using deXtrusion_RetrainNetwork.ipynb jupyter notebook. Here, one can use two approaches: 1) Annotate fully one movie representative of your dataset and retrain the model with these new datas (recommended approach). 2) If your data is hard to generate and/or you have very few replicates, you could annotate only a subset/crop of your movie and retrain the model with this annotations.
Perspective of Development
Finally, we are now trying to bring it all together by combining all the functions around the pipeline (detection/prediction, training, retraining, correction, interactions) into one napari pluggin. This make it easy to interact with the images and prediction by having the point data as well as the prediction and the original image into one software only, we will also support other file formats (.tif, .hdf5, etc…)
Acknowledgments
I want to thank everyone who helped us to get this publication together, mainly Gaelle the co-first author who helped me tremendously throughout the project with the code, Léo for contributing to the annotation data and discussion and Romain for excellent guidance and advices. More generally all the Levayer lab for support. I am very grateful to have had the opportunity to work with this team and really enjoyed the whole process.
[1] Alexis Villars, Gaëlle Letort, Léo Valon, Romain Levayer; DeXtrusion: automatic recognition of epithelial cell extrusion through machine learning in vivo. Development 1 July 2023; 150 (13): dev201747. doi: https://doi.org/10.1242/dev.201747
[2] Benoit Aigouy, Claudio Cortes, Shanda Liu, Benjamin Prud’Homme; EPySeg: a coding-free solution for automated segmentation of epithelia using deep learning. Development 15 December 2020; 147 (24): dev194589. doi: https://doi.org/10.1242/dev.194589
[3] Stringer, C., Wang, T., Michaelos, M. et al. Cellpose: a generalist algorithm for cellular segmentation. Nat Methods 18, 100–106 (2021). https://doi.org/10.1038/s41592-020-01018-x
Alexis Villars
 (2 votes, average: 1.00 out of 1)
Get involved
Create an account or log in to post your story on FocalPlane.
More posts like this


Filter by
- NewsApply
- DiscussionsApply
- How toApply
- ToolsApply
- Case studiesApply
- InterviewsApply
- JobsApply
- EducationApply
- Blog seriesApply
- From Zero to Qupath ..HeroApply
- Asian Microscopists ..and Cell BiologistsApply
- AIC at HHMI JaneliaApply
- Deep Learning for Bi..o-image analysisApply
- GloBIAS – updates fr..om the communityApply
- WAMBIAN: West Africa.. in FocusApply
- Volume EMApply
- Latin American Micro..scopistsApply
- Bio-image Analysis w..ith NapariApply
- Imaging with…Apply
- Towards Global Acces..sApply
- Latin America Bioima..gingApply
- Highlights from Euro..-BioImagingApply
- LSFM seriesApply
- DIY MicroscopyApply
- View all