Prompt Engineering in Bio-image Analysis
Posted by Mara Lampert, on 18 July 2024
Prompt engineering and its importance
Communication is key. This saying is not only true in day-to-day life, but also when interacting with Generative Artificial Intelligence, a system able to generate text, images or other output types in response to prompts. In prompt engineering, we use natural language to describe the task that a Large Language Model (LLM) should perform. Hereby, the description and its quality has a huge influence on the output of the model. To break it down, we are talking about the art of asking good questions. This blog post aims to describe the strategies of prompt engineering, focussing on the application in Bio-image analysis using bia-bob, a Jupyter-based assistant for interacting with data.
Tactics in Prompt engineering
LLMs have certain tasks they are very good at and other qualities they are lacking, at least at the moment. Robert named several examples for this in a ScaDS Living Lab Lecture.
To receive helpful answers, here you can find a summary of tactics for prompt engineering
| Tactic | Description | Example |
|---|---|---|
| Provide detail | If you have a specific task/question in mind, it might make sense to provide the needed amount of detail to receive a more suiting output. | “Please name widely used deep-learning based segmentation algorithms for bio-image analysis“ |
| Specify target group/ perspective | Assign role to LLM and/or tell them who they are speaking to. | “You are a computer science professor explaining image segmentation to a biology student.” |
| Determine output style | Specify the length of output, speaking style, language | “Summarise in 1-2 sentences.” “Explain this segmentation algorithm like you are speaking to a friend who did not hear about it before“ |
| Required steps | Name necessary steps that the LLM should cover or use chain of thought (let LLM first formulate steps and then description). | “Please explain how one can perform connected component labelling. Therefore, cover the following steps: Denoising, Thresholding, Labelling” “Explain how to perform connected component labelling. Therefore, come up with all needed processing steps from loading the image to labelling” |
| Provide examples | “Mask-R CNN is an example of a top-down deep learning based segmentation approach. StarDist would be an example of a bottom-up based segmentation approach. How would you define these two different types of approaches? ” | |
| Let the model reflect on its output | Is this really correct/ the best solution? | “Is Cellpose really a top-down deep-learning based segmentation approach?” |
Prompt engineering in Bio-image Analysis using bia-bob
In Bio-image Analysis applications, we can use bia-bob inside Jupyter notebooks to create workflows, for debugging or code generation. Bia-bob can also create entire Jupyter notebooks itself.
What is Bia-bob and where to find it?
Bia-bob is an open-source tool which is extensible through plugins. Hereby, your (image) data is not uploaded to some sort of server, but the written prompts are. This needs to be kept in mind for data safety. Essentially, bia-bob consists of one long prompt which is composed dynamically, depending on the installed libraries. If you are curious how, see Bia-bob GitHub repo.
Installing Bia-bob
For setting up bia-bob, it is recommended to create a virtual environment using conda or mamba. If you don’t know how to set up mamba, please read this guide.
Next, we create a virtual environment with all the tools we need like this:
conda env create -f https://github.com/haesleinhuepf/bia-bob/raw/main/environment.yml (I ran into an error message here related to MacBook M1 and M2 Pro chip. If you also struggle check out this solution.)
Now, you can activate the created environment:
conda activate bob_envOpenAI is the default backend for bia-bob. But it can also make use of Google’s Gemini, Anthropic’s Claude, Helmholtz’ blablador and Ollama.
If you don’t know yet what frontend and backend are, consider this analogy:
If you are working in a lab, the tools that you are directly interacting with, like pipettes, microscopes, autoclave, is your frontend – the part the user directly interacts with.
Now, consider the equipment in your lab which is crucial for performing experiments but you do not directly interact with, like electricity powering your microscope or the servers storing your data. This is referred to as backend in software.
In order to have access to our backend for Bia-bob, we need to create an OpenAI API Key as explained in this video. Save your key immediately in a save place. To execute code using these models is not free, so we also need to provide a payment method as explained in this blog post.
Next, we can add our OpenAI API Key to our environment variables named OPENAI_API_KEY as explained on this page.
Now, we are good to go to try out bia-bob in a Jupyter notebook by activating our virtual environment:
mamba activate bob_envand calling jupyter lab
jupyter labWorkflow creation with Bia-bob
Comment: the jupyter notebooks that are showed in this section are publicly available: Working with czi-files and Segmenting platynereis dumerilii.
First, we create a new Jupyter notebook in the directory of our choice:

And give our new Jupyter notebook a suitable name:

The default version of GPT-4 (known as GPT-4 Omni) has integrated vision capabilities. This means you can provide bia-bob with images, and it will generate code to segment structures of interest within those images, provided it can identify them.
First we need to import all needed packages:

Now, we will explore a dataset of the marine annelid Platynereis dumerilii from Ozpolat, B. et al licensed by CC BY 4.0. This is a czi-file with multiple timepoints and has the dimensions x,y and z. Furthermore, it has 3 channels. Let us test if bob is able to load this more advanced data structure:


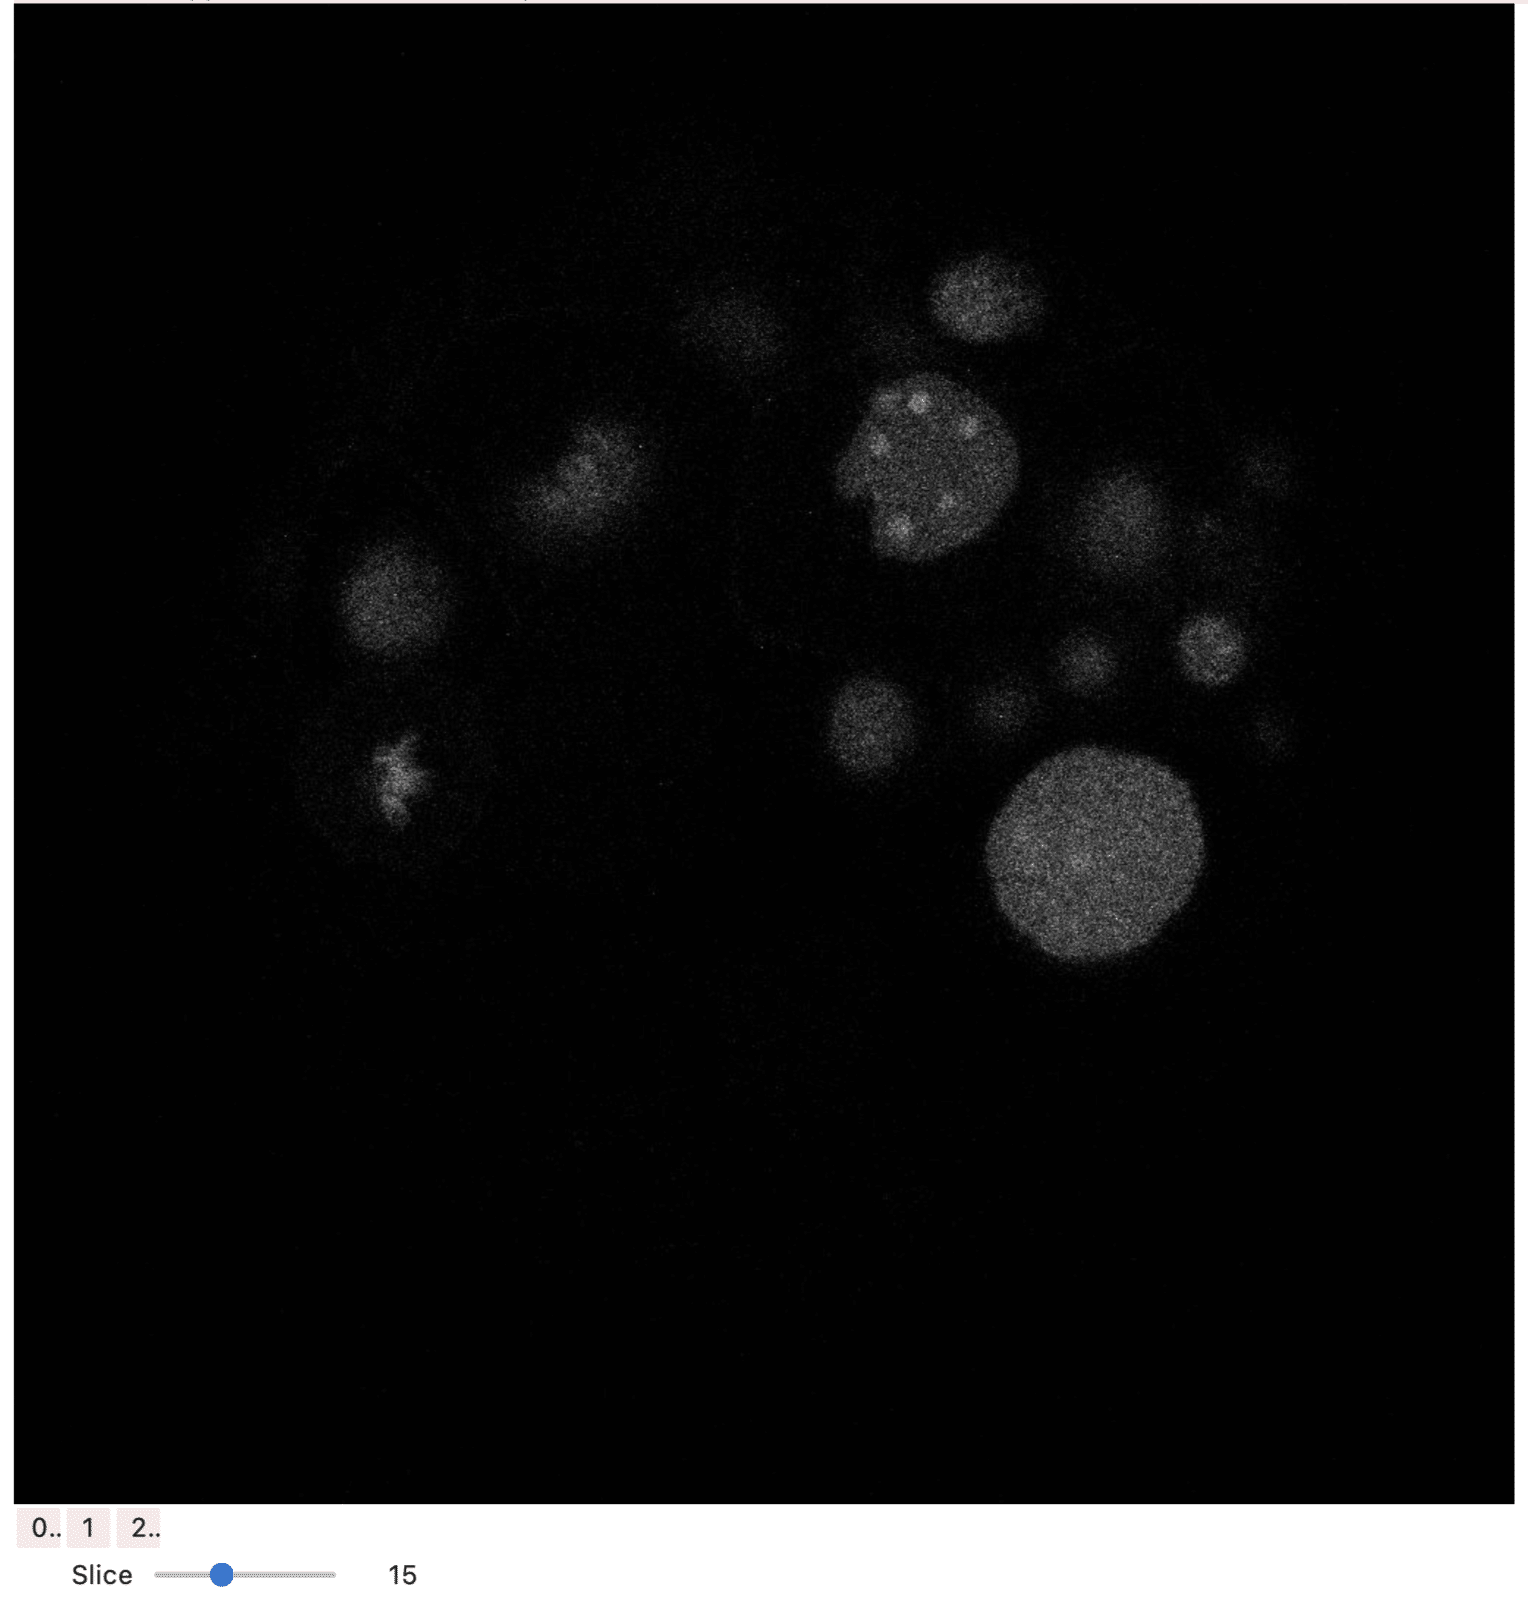
Here, the image is displayed using stackview which is an interactive image stack viewer in jupyter notebooks. Stackview switch allows to visualise all channels individually and also go through all slices with a slider.
For simplicity reasons, we now continue with a single timepoints and channel as a tif-file which you can find here.


Now, lets segment our image


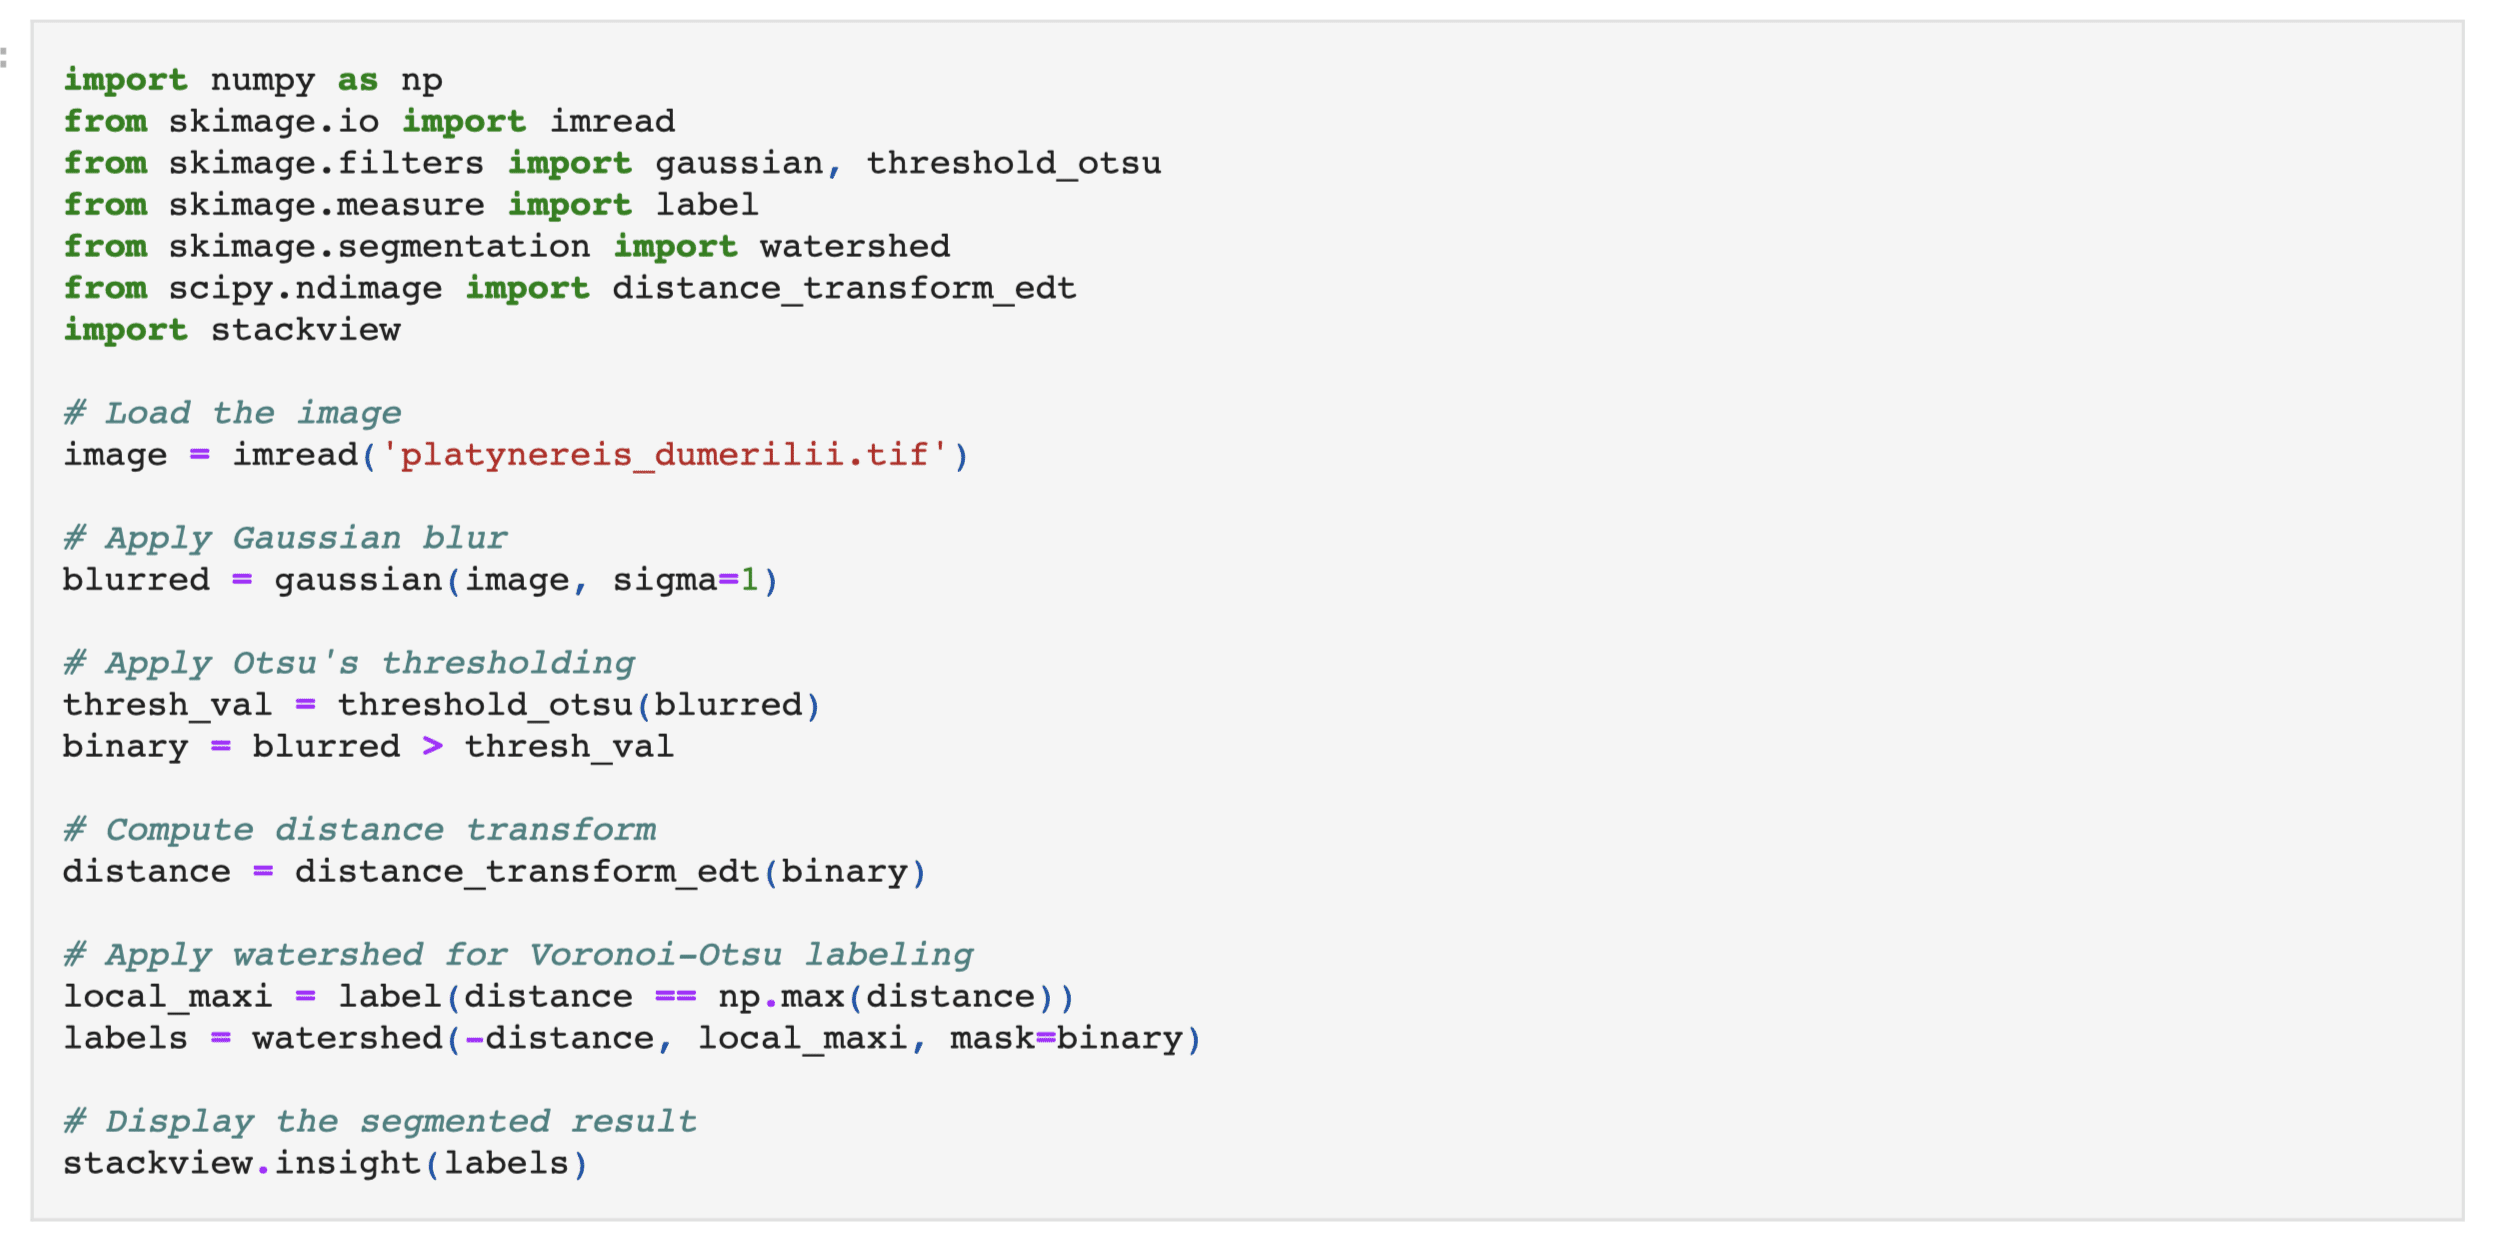

This didn’t work how I expected, let us specify our prompt:

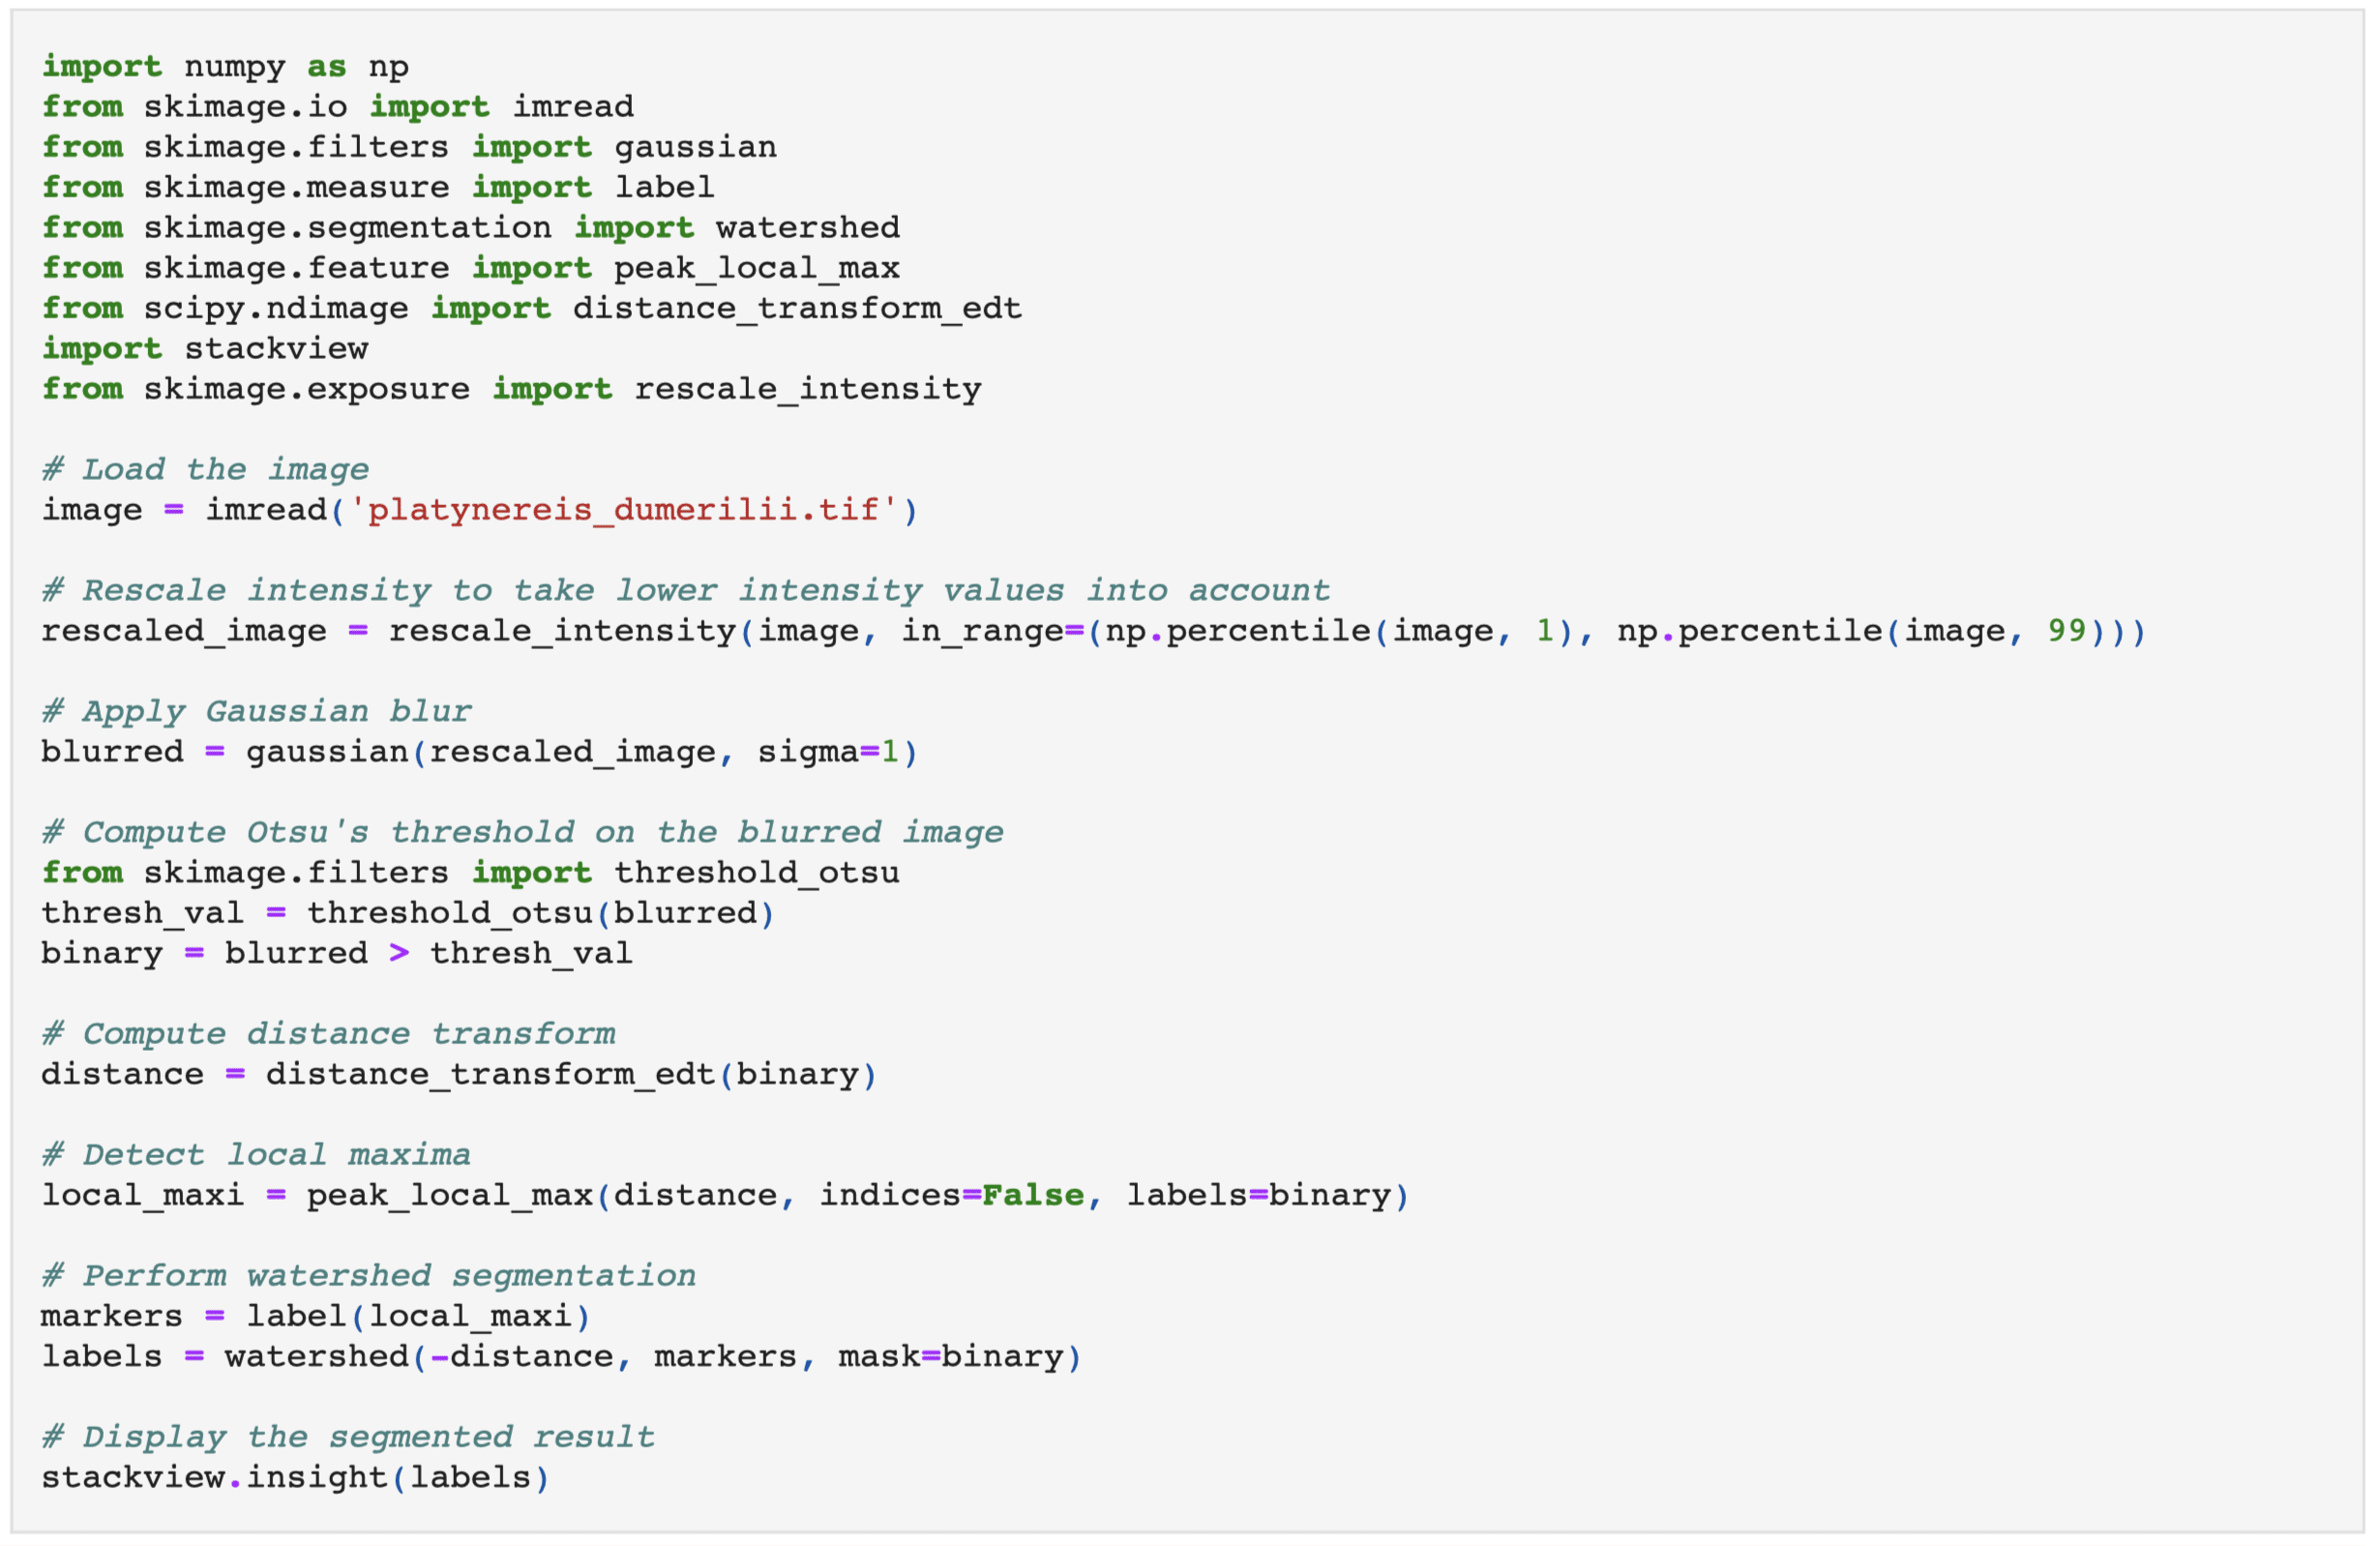

Now we are encountering oversegmentation, meaning we have more labels than objects. Let us specify our prompt again:


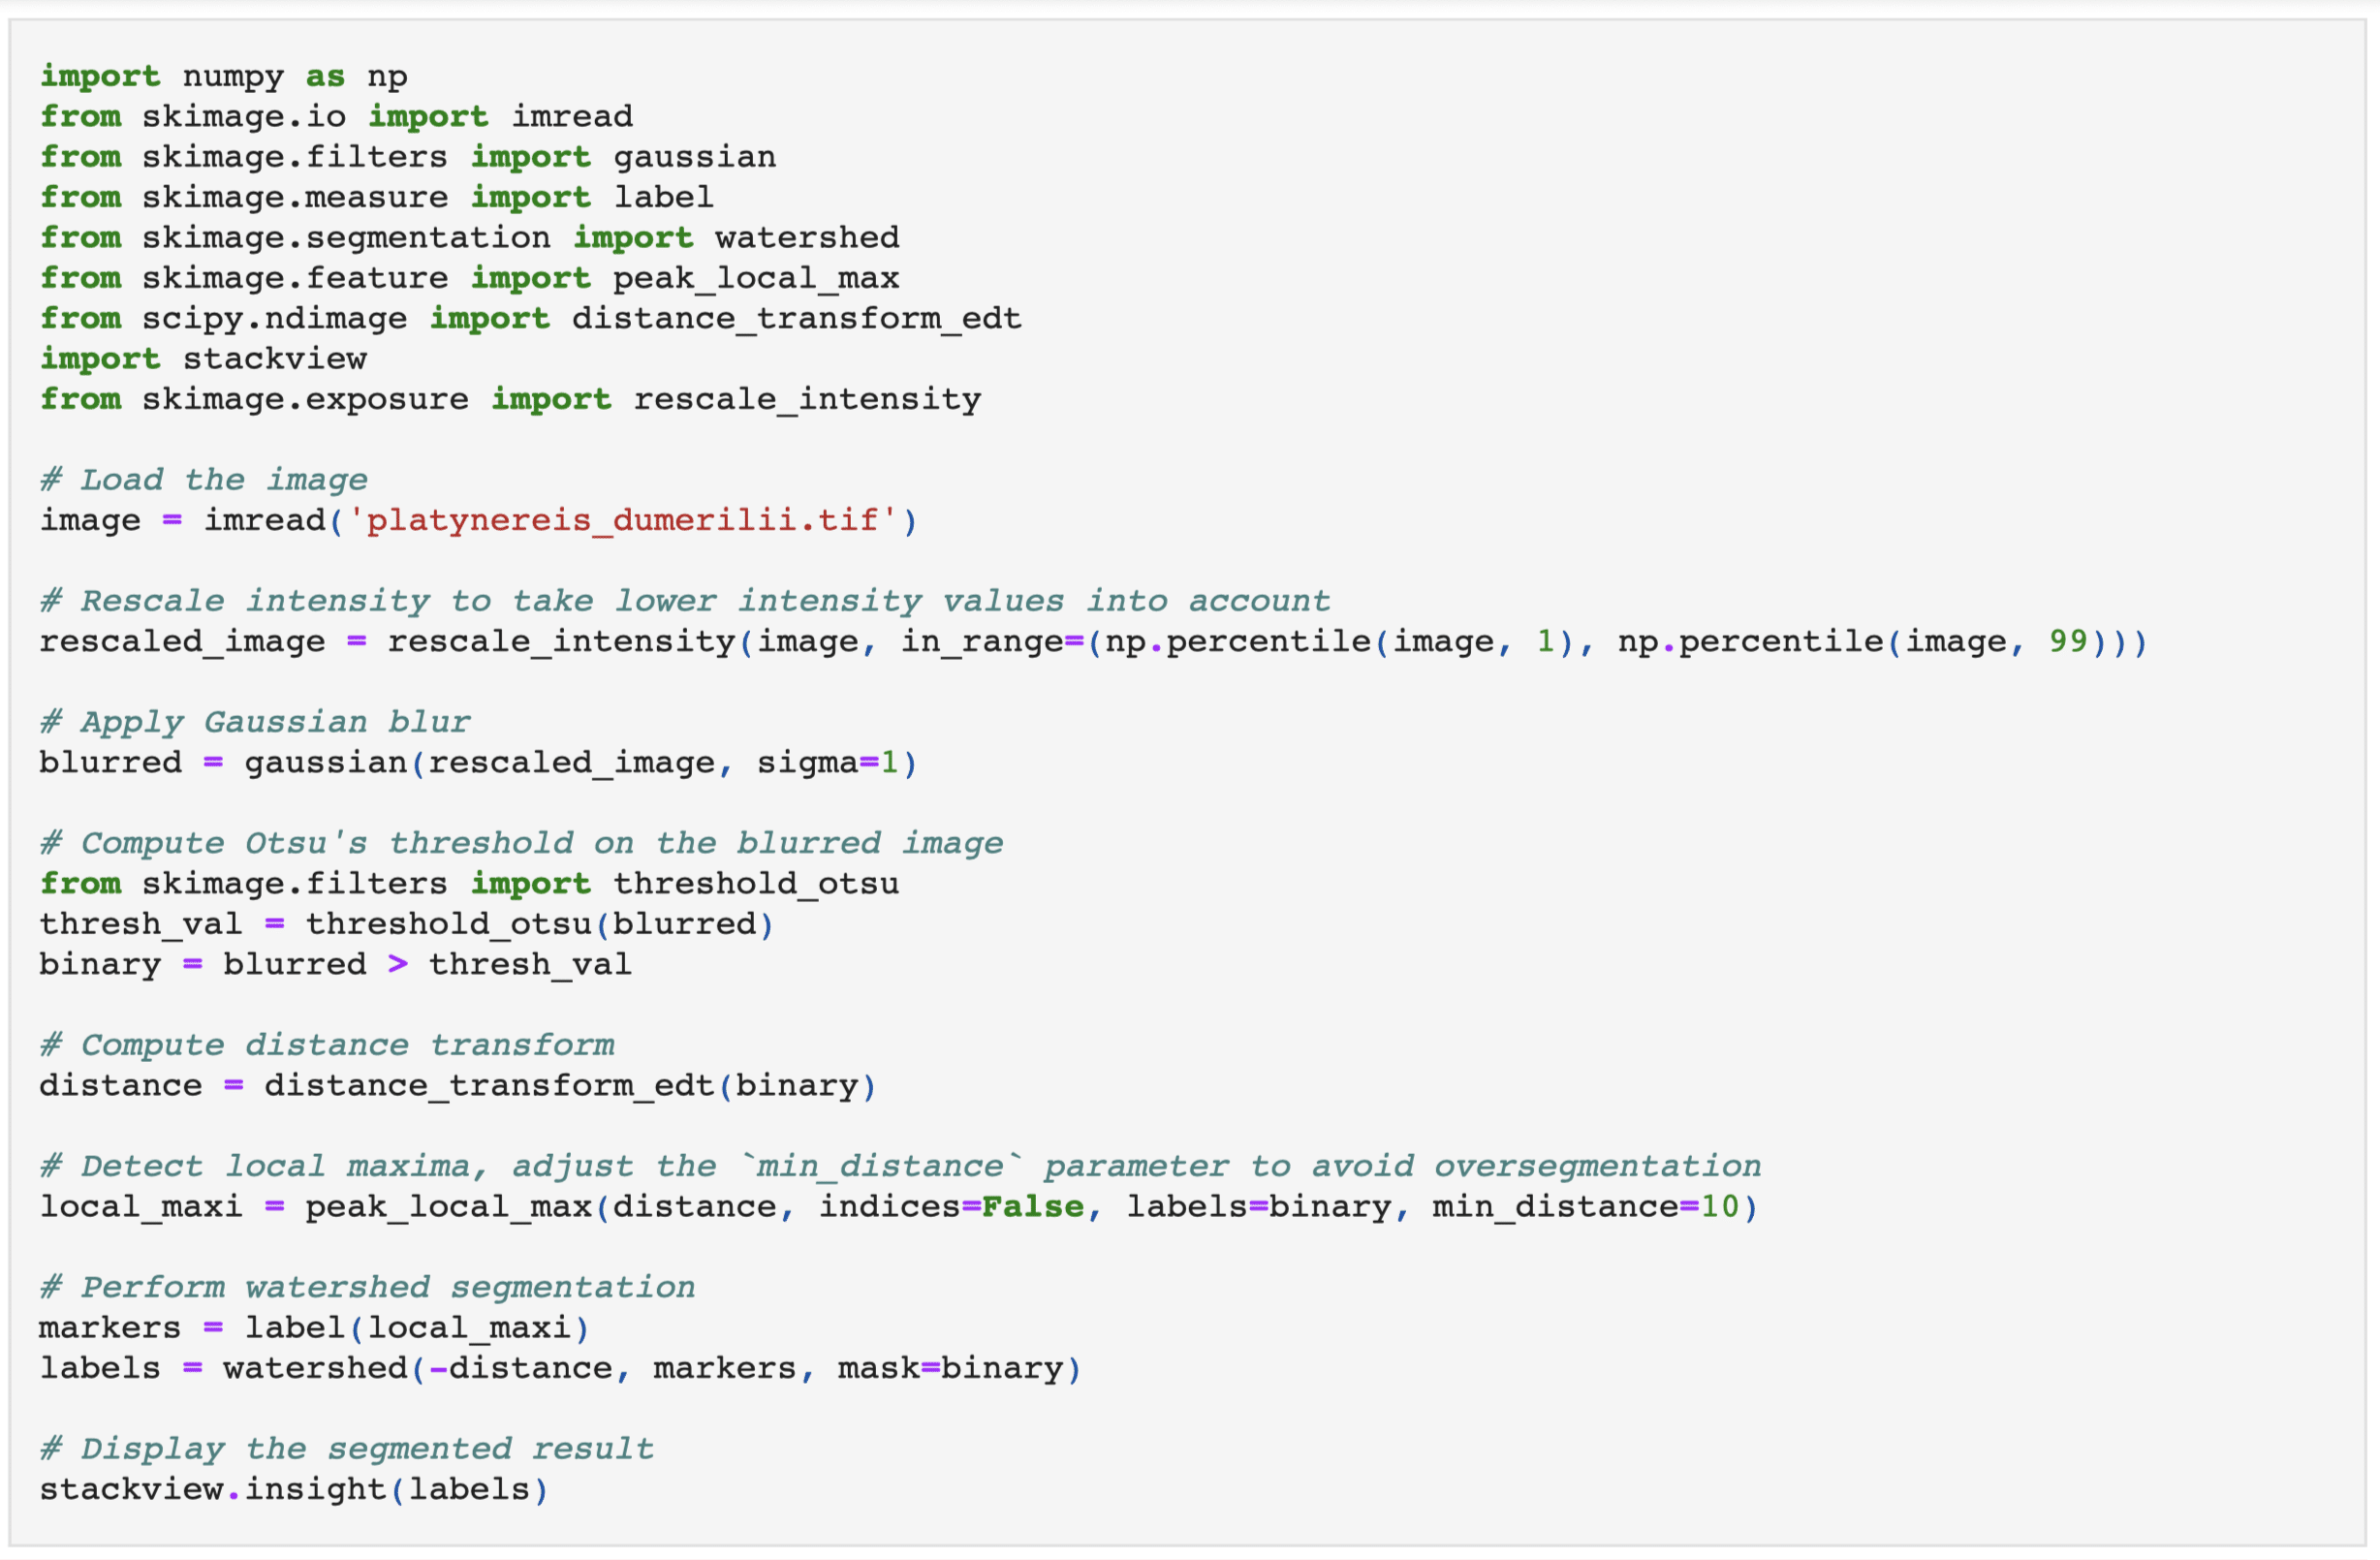
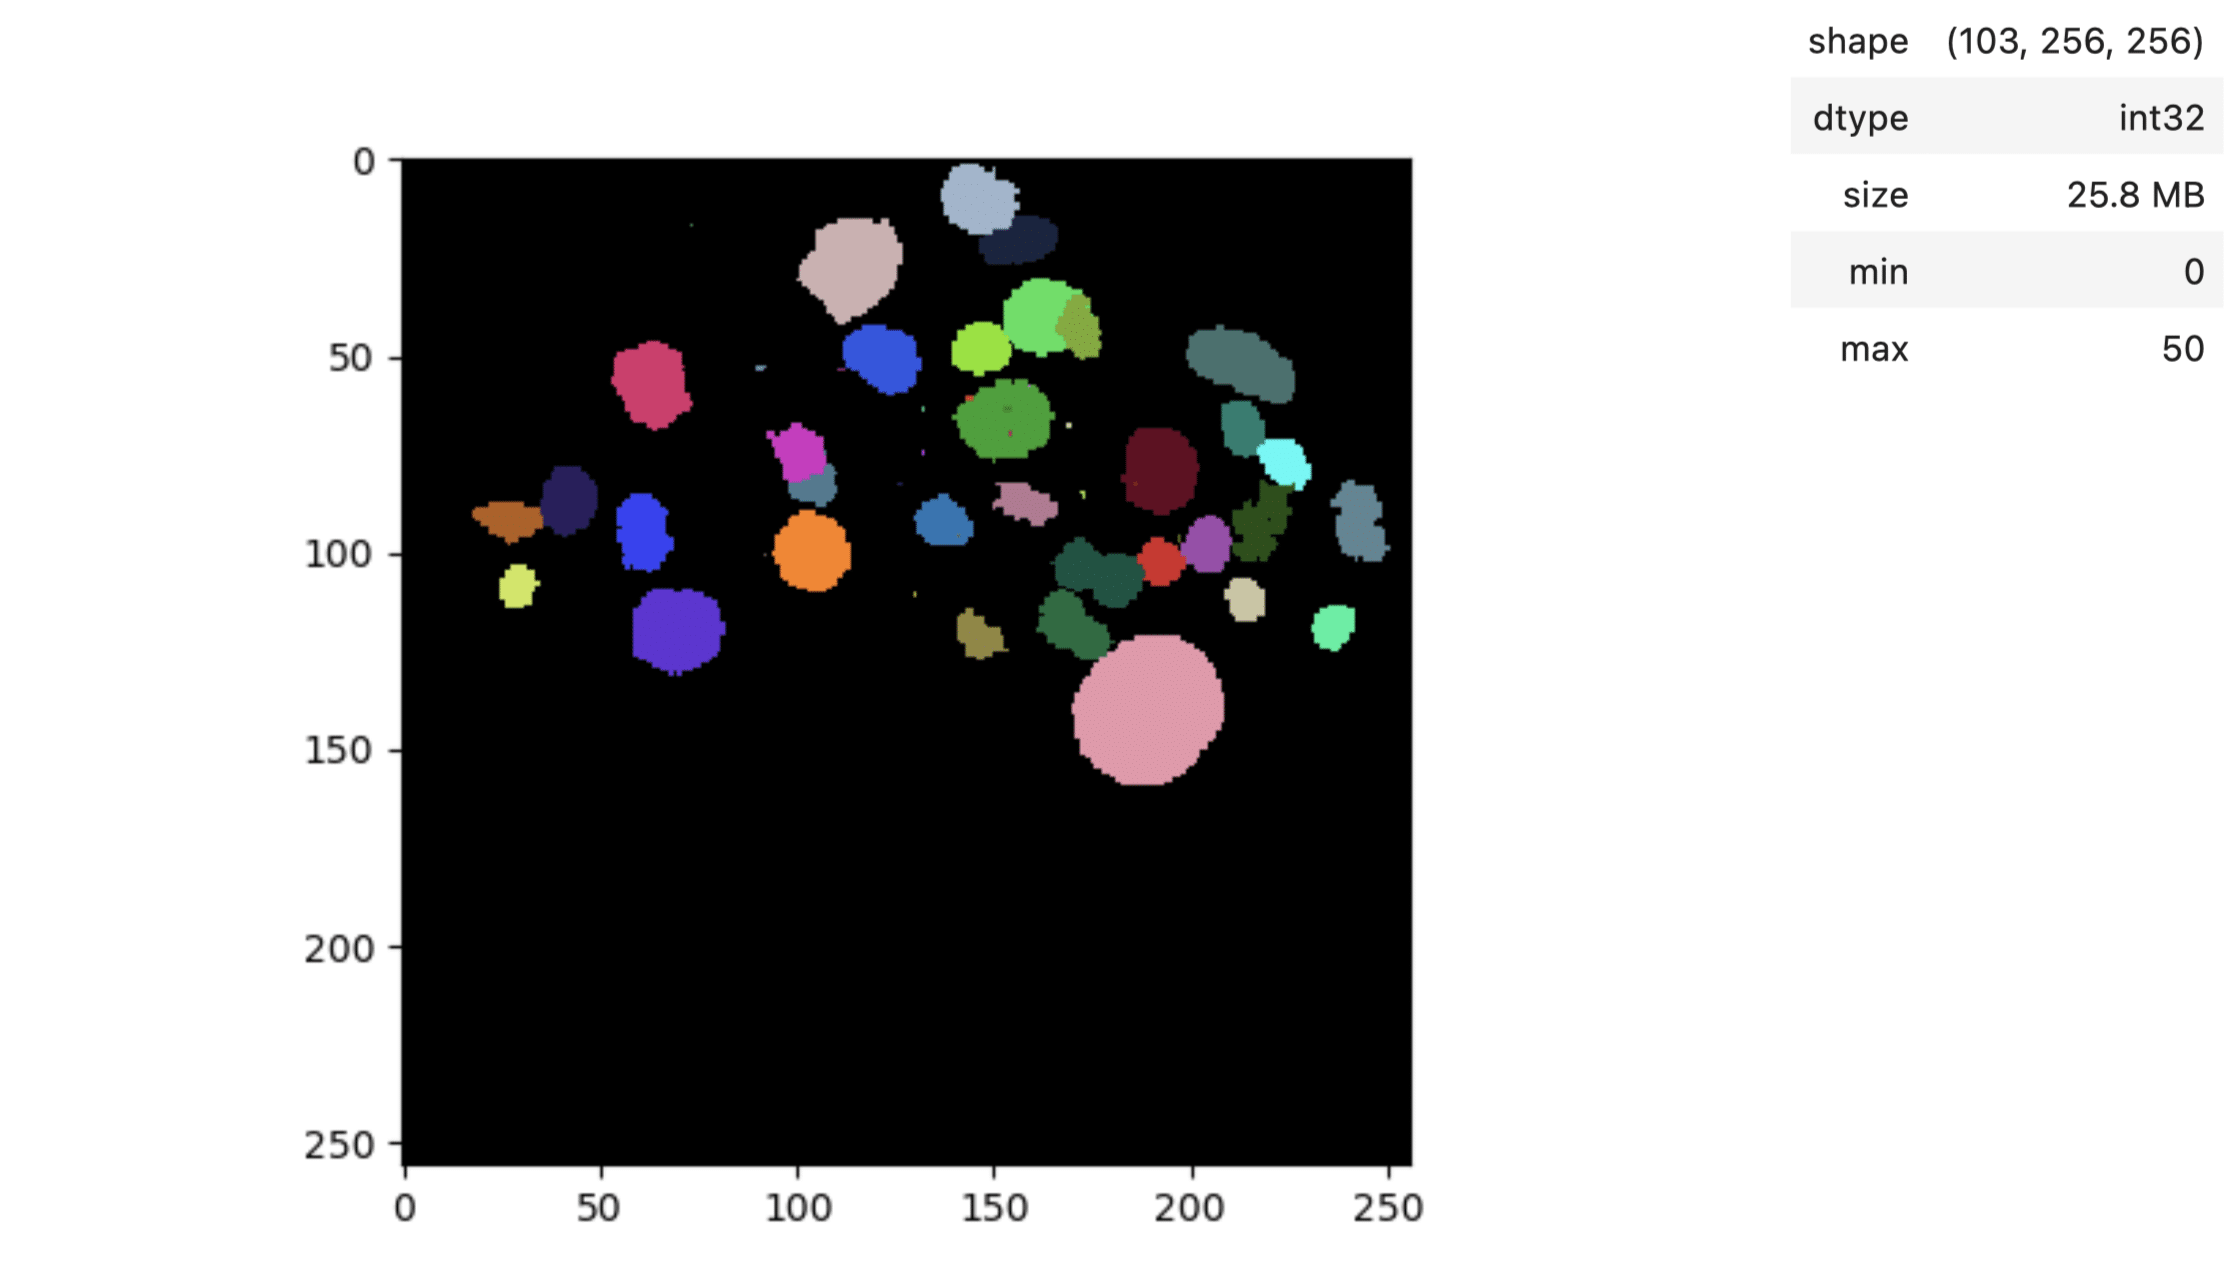
This looks more reasonable now, Bia-bob has a lot more to offer than I showed now: notebook generation, notebook modification, bug fixing, code documentation and GPU acceleration.
Current limitations and perspectives of Bia-bob
One difficulty using bia-bob is to still ensure good scientific practice as code validation is difficult and the same prompt might produce different outputs every time it is executed (reproducibility).
Furthermore, it is not guaranteed to use state-of-the-art methods, but might also use older methods. This issue I did not encounter in this example, but one needs to keep it in mind.
In the future, it would be cool to extend bob, so that it can be used not only for bio-image analysis applications, but also for other fields like geography.
Take home messages
- Prompts and their quality have a huge influence on the output of a model.
- There are different tactics one can follow when doing prompt engineering.
- In Bio-image Analysis applications, we can use bia-bob inside Jupyter notebooks to create workflows, for debugging or code generation.
Further reading
- Prompt engineering Chapter in Bio-image Analysis Notebooks
- Bia-bob ScaDS.AI Living Lab YouTube lecture
- Prompt Engineering chapter in Bio-image Analysis Notebooks by Dr. Robert Haase
- FocalPlane blog post Creating a Research Data Management Plan using chatGPT by Dr. Robert Haase
- Prompt Engineering for Quantitative Bio-image Analysis slides by Dr. Robert Haase
- Prompt engineering, Retrieval-augmented generation and fine-tuning Lecture by Dr. Robert Haase
- DigitalSreeni Youtube channel
- Natural Language Processing ScaDS.AI Living Lab YouTube lecture
- Generative Artificial Intelligence for Bio-image Analysis video by Dr. Robert Haase
Feedback welcome
Some of the packages used above aim to make intuitive tools available that implement methods, which are commonly used by bioinformaticians and Python developers. Moreover, the idea is to make those accessible to people who are no hardcore-coders, but want to dive deeper into Bio-image Analysis. Therefore, feedback from the community is important for the development and improvement of these tools. Hence, if there are questions or feature requests using the above explained tools, please comment below or open a thread on image.sc. Thank you!
Acknowledgements
I want to thank Dr. Robert Haase as the developer behind the tool shown in this blogpost
The author acknowledges the financial support by the Federal Ministry of Education and Research of Germany and by Sächsische Staatsministerium für Wissenschaft, Kultur und Tourismus in the programme Center of Excellence for AI-research „Center for Scalable Data Analytics and Artificial Intelligence Dresden/Leipzig“, project identification number: ScaDS.AI.
Reusing this material
This blog post is open-access, figures and text can be reused under the terms of the CC BY 4.0 license unless mentioned otherwise.


 (2 votes, average: 1.00 out of 1)